
In earlier versions of SuperSTAR, the user catalogue (details of users, permissions and passwords) was stored in an XML file. If you installed to the default location, this was saved in C:\ProgramData\STR\SuperADMIN\server\data\.repository\userCatalog.xml.
The use of XML can cause performance issues if you have a large number of user accounts. As a result, from version 9.9 onwards, SuperADMIN uses a relational database to store all user data.
When you upgrade to version 9.9 or later, SuperADMIN will automatically convert the user data from userCatalog.xml to a relational database (RDBMS). By default, it will store user data in an H2 database (located in C:\ProgramData\STR\SuperADMIN\server\data\superadmin.db), but you can switch to any of the following relational databases if you prefer:
-
MySQL / MariaDB
-
PostgreSQL
-
SQL Server
-
Oracle
-
DB2
What Will Be Stored in the RDBMS
From 9.9 onwards, the following are stored in the RDBMS after the migration:
-
Configuration server data
-
User registration details
-
Users and passwords
-
Groups
This change should only be made before going into production. Please contact WingArc support for advice if you wish to change the RDBMS for a production system.
In particular, if you have already updated to version 9.9 or later, then your SuperADMIN data will already have been moved to H2. We do not currently provide an automated process for migrating from H2 to another RDBMS.
Step 1 - Export the Configuration Server Settings
Before starting the migration, you are strongly recommended to export any existing configuration server data to a text file. This step is only required when you have an existing SuperSTAR system running version 9.0 or higher. Run the following command in SuperADMIN:
cfg save <filename>
Replace <filename> with the full path to a file on disk where you want to save the settings. Do not use quotes even if the path contains spaces.
For example:
cfg save D:\Backup Directory\configuration settings.json
After you run the command, check that the file has been created in the specified location. You will need to use this file in a later step to reimport your configuration settings.
Step 2 - Create a Database and User
The first step is to create a database for the user data in your chosen RDBMS. To complete this step you may need to install a suitable database server or obtain access to an existing database server.
-
Create a new database. For example, you might call the database SuperSTAR_Users.
Set the default character set of your database to UTF8. This will allow the User Data Repository to save usernames containing the full range of unicode characters.
-
Create a dedicated database user account and set the account password.
If you are using Oracle or DB2 then the username for connecting to the database must be the same as the database schema.
-
Grant your new user account full privileges over your new database.
Step 3 - Install a JDBC Driver
JDBC (Java Database Connectivity) is a programming interface that lets Java applications access a relational database. You need to install a JDBC driver for your RDBMS, so that SuperWEB2 can communicate with the User Data Repository database.
-
Download the appropriate JDBC driver for your database:
RDBMS
Recommended Driver
Example of JAR File
Driver Class
Download From
MariaDB
Connector/J
mariadb-java-client-2.5.4.jar
org.mariadb.jdbc.Driver
https://mariadb.com/downloads/#connectors
MySQL
Connector/J
mysql-connector-java-5.1.41-bin.jar
com.mysql.jdbc.Driver
https://www.mysql.com/downloads/connector/j/
Oracle
ojdbc7.jar
ojdbc7.jar
oracle.jdbc.driver.OracleDriver
https://www.oracle.com/technetwork/database/features/jdbc/jdbc-drivers-12c-download-1958347.html
SQL Server
Microsoft JDBC Driver
mssql-jdbc-7.2.2.jre8.jar
com.microsoft.sqlserver.jdbc.SQLServerDriver
https://www.microsoft.com/en-us/download/confirmation.aspx?id=57782
DB2
DB2 JDBC Driver
db2jcc4.jar
com.ibm.db2.jcc.DB2Driver
https://www-01.ibm.com/software/data/db2/linux-unix-windows/downloads.html
PostgreSQL
PostgreSQL JDBC 4.2 Driver, 42.0.0
postgresql-42.0.0.jar
org.postgresql.Driver
https://jdbc.postgresql.org
The JDBC driver must support JDBC 4.2 (Java 8).
You do not need to download a driver to use the default H2 RDBMS as this driver is included with SuperADMIN.
-
Copy the driver .jar file to C:\Program Files\STR\SuperADMIN\server\lib\endorsed (or equivalent directory if you installed to a non-default location). You will need to create this directory if it does not already exist.
Step 4 - Configure SuperADMIN
Configure SuperADMIN to use your preferred RDBMS by adding the following section to the local.conf configuration file.
If you installed to the default directory, this file is located in C:\ProgramData\STR\SuperADMIN\server\config\local.conf.
str.superadmin {
    jdbc {
        url: "URL"
        username: "USERNAME"
        password: "PASSWORD"
        platform: ${db."DBTYPE"}
    }
}
If your local.conf file already has a str.superadmin section, then add the new section within the existing str.superadmin section. For example:
Replace the following with the relevant values:
|
URL |
The JDBC connection string for your chosen RDBMS. The following are typical connection strings:
|
||||||||||||||||||
|---|---|---|---|---|---|---|---|---|---|---|---|---|---|---|---|---|---|---|---|
|
USERNAME |
The username for the account you created in Step 1. |
||||||||||||||||||
|
PASSWORD |
The password for the account you created in Step 1. |
||||||||||||||||||
|
DBTYPE |
One of the following strings:
|
For example, the following section might be used to connect to SQL Server:
str.superadmin {
    jdbc {
        url: "jdbc:sqlserver://mydatabasehost:1433;databaseName=SuperSTAR_Users"
        username: "superadminuser"
        password: "asd3fws4gwsd"
        platform: ${db."SQLServer"}
    }
}
Step 5 - Check SuperADMIN Migration Settings
If you are upgrading from an earlier release, make sure that the following XML files are present in the server data repository directory: userCatalog.xml and accountCatalog.xml (if you installed to the default location, check that the files exist in the C:\ProgramData\STR\SuperADMIN\server\data\.repository\ directory).
This step is not required if you are configuring a fresh installation of SuperSTAR as these files are not created after version 9.9.
Step 6 - Configure SuperADMIN
Run the following command in SuperADMIN:
cfg global superadmin.migration.userCatalog set "false"
This ensures that SuperADMIN will migrate the catalogue to the RDBMS on the next restart.
Step 7 - Restart SuperSERVER
You will need to restart the SuperADMIN/SuperSERVER service to apply this change. When the service has started, verify that the tables have been created in your RDBMS. For example:
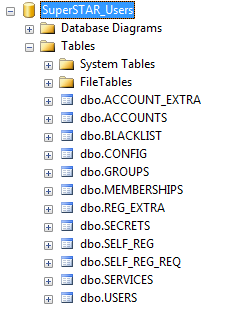
SuperADMIN does not delete the legacy XML file (UserCatalog.xml) following a successful migration, although this file will no longer be required or used and will not need to be restored during a future upgrade.
Step 8 - Reimport your Configuration
If you exported your existing configuration settings at the start of the process, run the following command in SuperADMIN to reimport your settings:
cfg load <filename>
Replace <filename> with the full path to a file on disk containing your saved settings. Do not use quotes even if the path contains spaces.
For example:
cfg load D:\Backup Directory\configuration settings.json