Accessibility
From version 9.12 onwards, SuperWEB2 complies with version 2.1 of the Web Content Accessibility Guidelines (WCAG), as published by the World Wide Web Consortium (W3C). SuperWEB2 complies at the AA level.
Some examples of SuperWEB2 features that have been implemented to support accessible use of the platform include the following:
- SuperWEB2 can be used with assistive technologies such as screen readers.
- Descriptive text is provided for all images.
- The solution is fully keyboard navigable.
See https://www.w3.org/TR/WCAG21/ for the official checklist published by the W3C. To assist our customers with their own validation and compliance requirements, we have also provided our own checklist with detailed notes on how SuperWEB2 complies with each item.
SuperWEB2 Keyboard Navigation
As part of SuperWEB2's accessibility support, SuperWEB2 can now be navigated entirely using the keyboard.
The SuperWEB2 keyboard controls generally follow standard conventions for keyboard navigation:
| Key | Description |
|---|---|
| Tab | Navigate between interactive elements such as buttons, controls, menus and links in sequential order from top to bottom and left to right. |
| Shift + Tab | Navigate back through buttons, controls, menus and links in reverse order. |
| Arrow keys | Navigate within elements such as tree controls (for example the list of datasets) and drop-down menus. To use these you need to first use the Tab key to move focus onto the element, and can then use the arrow keys to move up and down the menu items, or up and down the list of datasets. See below for more details. Please note that if you are using Apple Mac Voice Over, you will need to use Command + Arrow keys to navigate within these elements instead when Voice Over is active. |
| Enter | Action the element that currently has focus (for example, follow a link, open a menu option, or execute a button action). |
| Space | Select a check box that currently has focus. |
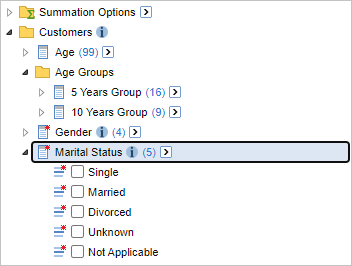
As you navigate through the items, your browser will highlight the element that currently has focus (the exact highlighting will depend on the browser you are using). In the following example, the Graph View link currently has focus, so pressing Enter in this case would open Graph View.

Navigating Menus
To access the menus in SuperWEB2, such as the main menu, the Table View settings menu, and the in-table menu, you first need to use the Tab key to move focus onto the menu.
Once the menu has focus, you can:
- Use the up and down arrows to navigate up and down the menu items.
- Use the left or right arrows to navigate into sub-menus.
- Use Enter to select a menu item.
Navigating Within Tree Controls
Several SuperWEB2 screens contain tree controls, such as the list of datasets and tables on the Datasets screen, as well as the list of fields and field values in Table View.
For these elements, pressing Tab will move focus onto and off the whole tree control. Once the tree control has focus, you then use the arrow keys to navigate within that tree control:
- Use the up and down arrow keys to navigate up and down through the individual items within the tree (for example to move up and down the list of datasets or fields).
- Use the left and right arrow keys (or Enter) when the focus is on a parent item in a hierarchy (such as a group of datasets, group of fields, or an individual field) to expand or collapse the child items.

Once you have moved the focus to an individual item in the tree that you are interested in, you can interact with that item as follows:
- (On the Datasets and Tables trees): Use Enter to select the currently-highlighted item. For example, press Enter to open the highlighted dataset or table in Table View.
- (On trees containing fields and field items, such as the one in Table View): Use Space to select or clear the check box for that item. You will then need to Tab back up to the Add to table buttons to add or remove your selected field items. See the steps below for more details.

Create Tables using Keyboard Navigation
It is possible to create tables using only keyboard controls. The basic process is to select the individual field items you want to add and then use the Add to table buttons to add your selections.
- In Table View, use Tab to move focus onto the entire field tree.
- Once the tree has focus, use the arrow keys to navigate to the field you are interested in.
- Once you have move focus onto a field that you want to use, you can either select items individually, or use the Select all at level drop-downs:
- To select items individually:
- Use the right arrow key to expand the field, then the up and down arrow keys to navigate down to an individual item
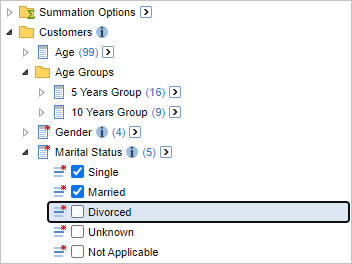
- Press Space to select the check box.
- Repeat the above steps until you have selected all the items you want to add to the table.
- To use Select all at level:
- With the field in focus, press Tab to move to the Select all at level drop-down.
- Press Enter to open the drop-down.
- Use the arrow keys to navigate to the level you want to use.
- Press Space or Enter to select all items at that level.
- To select items individually:
- Once you have selected all the items you want, use Tab to move focus back to one of the Add to table buttons (Row, Column, Wafer, and Filter), which appear above/before the field list.
- Press Enter to action the button and add the selected items to the table.
You can also use these steps to remove items from the table. Simply use the steps to select the check boxes for items that are already in the table. When you Tab back to the buttons you will have access to the Remove button, which will remove those items from the table.
When you select field items, you will usually want to select items from only one field at a time, and then use the buttons to add these to the table. If you select items from a mixture of fields, these will be concatenated onto the same axis.
For example, if you select Male, Female and Unknown from the Gender field, then use the Add to Row button, this will add these items from Gender into your table rows. However, if you select Male from Gender and Single from Marital Status, and then use the Add to Row button, this will concatenate these two items on the rows. Concatenating produces a table that gives you the number of people who are Male and the number of people with Marital Status of Single, but does not give the cross tabulation (the number of Males in the dataset who are Single).
Navigating Map View
In Map View, when the focus is on one of the drop-down lists (such as the Field drop-down list), you can start typing to search through the available items in the list. For example, you can type the start of a field item to quickly move to that item within the list.
Ensuring Customer Modifications are WCAG Compliant
There are a number of areas of SuperWEB2 where administrators can add their own content. This includes the HTML info pages that display on the dataset catalogue screen, the contents of the interactive tour, as well as descriptive metadata, annotations, and documentation accessible via the help link.
To maintain WCAG-compliance throughout the solution, it is important to ensure that any web content you add to SuperWEB2 also complies with the WCAG specification. Refer to WCAG 2.1 Checklist or the official W3C guidelines for more details.
Accessibility Testing - Verified Screen Readers
WingArc has tested SuperWEB2 using the following screen reader technologies:
- Job Access With Speech ( JAWS)
- NV Access (NVDA)
- Microsoft Windows in-built text to speech / narration capability
- Apple Mac Voice Over
Browser Support
WingArc has tested SuperWEB2 using the following browsers:
| OS | Browser | Compliance |
|---|---|---|
| Windows | Chrome | WCAG 2.1 AA |
| Windows | Edge | WCAG 2.1 AA |
| Windows | Firefox | WCAG 2.1 AA |
| Windows | Internet Explorer 11 | WCAG 2.1 AA |
| Mac | Safari | SuperWEB2 is not currently fully WCAG 2.1 AA compliant in this browser. We are actively working to resolve this and intend to fix in a future release. |
| Mac | Chrome | WCAG 2.1 AA |
