
These instructions explain how to set up the User Data Repository to use a relational database such as MySQL, Oracle or SQL Server.
Before starting, make sure you have installed SuperWEB2 and verified that it is working correctly.
Step 1 - Create the User Data Repository Database and Database User
The first step is to create a database for the User Data Repository in your chosen RDBMS. To complete this step you may need to install a suitable database server or obtain access to an existing database server:
-
Create a new database. For example, you might call the database UDR_SuperWEB2.
-
Set the default character set of your database to UTF8. This will allow the User Data Repository to save tables containing the full range of Unicode characters.
There is currently a known issue with Unicode support on SQL Server; the User Data Repository creation scripts do not currently support collations with the UTF8/UTF16 flags or the SC (Supplementary Characters) flag and do not use Unicode-compliant column types when creating the database. If you are using SQL Server, use a non UTF8/UTF16 collation and follow the steps below under "Update Column Types" to update the column datatypes to support Unicode after creating the User Data Repository database.
-
-
Create a dedicated database user account and set the account password.
-
If you are using Oracle or DB2 then the username of the user you are using to connect to the database must be the same as the database schema
-
-
Grant your new user account full privileges over your new database.
Step 2 - Install a JDBC Driver
JDBC (Java Database Connectivity) is a programming interface that lets Java applications access a relational database. You need to install a JDBC driver for your RDBMS, so that SuperWEB2 can communicate with the User Data Repository database.
-
Download the appropriate JDBC driver for your database:
RDBMS
Recommended Driver
Example of JAR File
Driver Class
Download From
Aurora MySQL
AWS MySQL Driver
aws-mysql-jdbc-1.1.7.jar
software.aws.rds.jdbc.mysql.Driver
DB2
DB2 JDBC Driver
db2jcc4.jar
com.ibm.db2.jcc.DB2Driver
https://www-01.ibm.com/software/data/db2/linux-unix-windows/downloads.html
MariaDB
MariaDB Connector/J
mariadb-java-client-2.4.1.jar
org.mariadb.jdbc.Driver
MySQL
Connector/J
mysql-connector-java-8.0.25.jar
com.mysql.cj.jdbc.Driver
Oracle
ojdbc
ojdbc11.jar
oracle.jdbc.driver.OracleDriver
https://www.oracle.com/au/database/technologies/appdev/jdbc-downloads.html
PostgreSQL
PostgreSQL JDBC Driver
postgresql-42.2.20.jar
org.postgresql.Driver
SQL Server
Microsoft JDBC Driver
mssql-jdbc-12.8.1.jre11.jar
com.microsoft.sqlserver.jdbc.SQLServerDriver
https://learn.microsoft.com/en-us/sql/connect/jdbc/download-microsoft-jdbc-driver-for-sql-server
-
Copy the driver .jar file to <tomcat_home>\lib. If you are using the standard installation location, this will be C:\ProgramData\STR\SuperWEB2\Tomcat\lib
If you are using the DB2 JDBC driver (4.16 or above), then you may encounter an error similar to the following in the SuperWEB2 logs on startup:
WARNING [main] org.apache.tomcat.util.scan.StandardJarScanner.processURLs Failed to scan [file:/C:/ProgramData/STR/SuperWEB2/lib/pdq.jar] from classloader hierarchy
        java.io.FileNotFoundException: C:\ProgramData\STR\SuperWEB2\Tomcat\lib\pdq.jar (The system cannot find the file specified)
This is due to the DB2 JDBC driver containing a reference to a missing JAR file, pdq.jar. pdq.jar is not required by SuperWEB2, and the issue can be resolved by removing the reference to it from the MANIFEST.MF file within the driver itself, as described in IBM's support documentation: https://www.ibm.com/support/pages/javaiofilenotfoundexception-thrown-apache-tomcat-application-server-ibm-data-server-driver-jdbc-and-sqlj
Please contact WingArc support if you require assistance to resolve this issue.
Step 3 - Configure the Data Source
The next step is to configure the data source by making changes to two configuration files: server.xml and context.xml.
server.xml
-
Open the file <tomcat_home>\conf\server.xml in a text editor.
-
Locate the
<GlobalNamingResources> ... </GlobalNamingResources>section of the configuration:XML<GlobalNamingResources> <!-- Editable user database that can also be used by UserDatabaseRealm to authenticate users --> <Resource name="UserDatabase" auth="Container" type="org.apache.catalina.UserDatabase" description="User database that can be updated and saved" factory="org.apache.catalina.users.MemoryUserDatabaseFactory" pathname="conf/tomcat-users.xml" /> </GlobalNamingResources> -
Add the following section before the closing
</GlobalNamingResources>tag:XML<Resource name="ds/superstar-udr" auth="Container" type="javax.sql.DataSource" maxTotal="100" maxIdle="30" maxWaitMillis="10000" username="USERNAME" password="PASSWORD" driverClassName="CLASSNAME" url="URL"/>You will need to customise this as follows:
-
Replace
USERNAMEandPASSWORDwith the username and password of your new database user. -
Replace
CLASSNAMEwith the driver class for the database you are using (see the table above to find the correct value for your database driver). -
Replace
URLwith the JDBC connection string for your database. Depending on the database you are using, you may need to include the schema you wish to use in the connection string; see the example below for more details.
All the examples shown here are for Tomcat 8 and above only. If you are using an earlier version of Tomcat, change
maxTotaltomaxActiveand changemaxWaitMillistomaxWait.PostgreSQL requires an additional parameter to be included in the resource definition,
defaultAutoCommit="false". Refer to the example below for PostgreSQL for more details.Following are some examples for the different database systems:
-
-
Save your changes to server.xml.
Make sure your RDBMS is configured to use a sufficiently large database connection pool to support the connections from SuperWEB2. Learn more.
context.xml
-
Open the file <tomcat_home>\conf\context.xml in a text editor.
-
Add the following section before the closing
</Context>tag:XML<ResourceLink global="ds/superstar-udr" name="ds/superstar-udr" type="javax.sql.DataSource"/>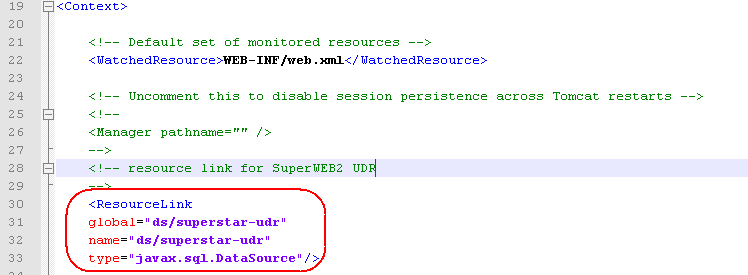
-
Save your changes to context.xml.
Step 4 - Start SuperWEB2 and Verify UDR Configuration
Now that you have completed the configuration, start the Tomcat/SuperWEB2 service. This will automatically create the empty UDR tables in the database.
When you have done this, follow these instructions to verify that UDR is setup correctly.
Step 5 (SQL Server Only) - Update Column Types
If you are using SQL Server, you will need to update some of the column types in the database in order to support the full range of Unicode characters in user-supplied names for saved tables and recodes.
Using a suitable tool for interacting with the RDBMS (for example, SQL Server Management Studio), update the design of the following columns in the newly created UDR database:
|
Table |
Column |
Initial Datatype |
Change To |
|---|---|---|---|
|
RECODE |
CONTENT |
text |
ntext |
|
RECODE |
NAME |
varchar |
nvarchar |
|
TXD |
CONTENT |
text |
ntext |
|
TXD |
NAME |
varchar |
nvarchar |
|
UDF |
CONTENT |
text |
ntext |
|
UDF |
NAME |
varchar |
nvarchar |