Set Up
This section describes how to set up Metadata Server for use with SuperCROSS or SuperWEB2 (or both).
Metadata Server allows both SuperCROSS and SuperWEB2 to support multilingual datasets and tables; users will be able to change the dataset/table language by selecting from the menu options.
Metadata Server can also be used to add extra descriptive information (metadata) about a dataset and its fields. This can be displayed to users in SuperCROSS and SuperWEB2 (SuperWEB2 also has its own alternative system for showing additional information about tables and fields using static HTML pages).
There are a number of steps involved in setting up Metadata Server:
If you decide to set up Metadata Server on your system then you are recommended to do this before going into production. Changing the multilingual status of a dataset in SuperADMIN (step 6 below) may invalidate saved tables, recodes and user defined fields that users have created for that dataset.
Step 1 - Create a Database
The first step is to create a new, empty, database in your chosen RDBMS. This will be used to store your metadata.
Create a new database. You do not need to create any tables in this database, as these will be created by the scripts you run in the next step.
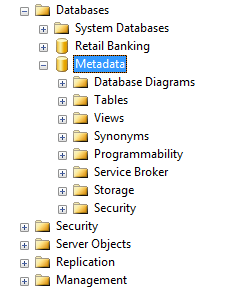
The new database can have whatever name you like. For example, you might call it Metadata:
Create a dedicated database user account and set the account password.
- Grant your new user account full privileges over your new database.
You will also need a JDBC driver so that SuperSTAR can connect to your database for the initial setup. Download a suitable JDBC driver for your chosen relational database system.
Step 2 - Edit and Run the Configuration Scripts
SuperSTAR is supplied with some configuration files for setting up metadata. You need to edit these files to suit your system.
Edit BuildMetadataTemplate.bat
The first file you need to modify is a windows batch file called BuildMetadataTemplate.bat. In a default installation, this file is located in C:\ProgramData\STR\SuperADMIN\MetaData\MetaDataUtilities
This is a script that will connect to both SuperSTAR and your new metadata database. It copies the structure of the SuperSTAR dataset to your metadata database, ready for you to start populating it with your metadata.
Open BuildMetadataTemplate.bat in a text editor.
Make a backup copy of this file before making any changes.
At the top of the file there are a number of lines that define various parameters the script will use. You need to modify the following lines to provide the appropriate details for your system:
| Locate the Following Line: | Make This Change: |
|---|---|
SET DB_DRIVER_CLASS= | Add the details of the JDBC database driver to use to connect to your database. For example: DB2:
CODE
MySQL:
CODE
Oracle:
CODE
PostgreSQL:
CODE
SQL Server:
CODE
|
SET DB_DRIVER_LOCATION= | Add the full path to the location of the database driver (jar file) on your system. Do not enclose the path in quotes, even if it contains spaces. For example: DB2:
CODE
MySQL:
CODE
Oracle:
CODE
PostgreSQL:
CODE
SQL Server:
CODE
|
SET DB_URL= | Add the connection string the script will use to connect to your metadata database. For example: DB2:
CODE
MySQL:
CODE
Oracle:
CODE
PostgreSQL:
CODE
SQL Server:
CODE
Replace the server and user details with the appropriate values for your system. In addition, make sure you check the port number matches the value in use on your system (in some cases the port number varies depending on whether you are using SSL and on which version of the database you are using). In these examples:
|
SET REPOSITORY= | Add a repository ID. This is an ID that you will use later on to connect the SuperSTAR Metadata Server to your database. It does not have to match the name of the database; it is just a text string that you will use later. For example:
CODE
|
You can also make the following changes if you wish, or just leave these parameters set to the default values:
| Parameter | Description |
|---|---|
SET VALUESET=20 | Specifies the maximum number of rows to write to each table in the metadata database. To specify no limit, set this to -1. Or leave it set to 20 (the default value). |
SET OVERWRITE=true | Specifies whether or not to overwrite the metadata database if it already exists. |
SET EXPORT_VALUESET=true | Specifies whether or not to export the classification table data to CSV (Comma Separated Values) files. |
When you have finished, save your changes to BuildMetadataTemplate.bat.
Edit databases.txt
This is a text file that specifies which SuperSTAR datasets you want to create metadata for. In a default installation, this file is located in C:\ProgramData\STR\SuperADMIN\MetaData\MetaDataUtilities
You can either create this file manually or use the createdatabaselist command in SuperADMIN.
The dataset list file must use the following format (if you use the SuperADMIN command it will generate a list of all of your SuperSTAR datasets in this format):
<dataset_id>|<display_name>|<full_path_to_SXV4>Where:
<dataset_id> | The ID of the dataset in the SuperSTAR catalogue. |
|---|---|
<display_name> | The dataset display name from the SuperSTAR catalogue. |
<full_path_to_SXV4> | The full path to the .sxv4 file that contains the dataset but without the .sxv4 file extension. |
For example, the shipped databases.txt file is as follows. This would instruct the batch process to create metadata tables and columns for the sample People and Retail Banking datasets:
people|people|C:\ProgramData\STR\SuperSERVER SA\databases\People
bank|bank|C:\ProgramData\STR\SuperSERVER SA\databases\RetailBanking
When you have finished editing databases.txt, save the file.
You are recommended to save this file in the same location as the standard shipped file. If for any reason you want to save the file to a different location, you will have to find the line SET DB_FILE_LIST="databases.txt" in BuildMetadataTemplate.bat and update it to point to your new filename and location.
Edit metacolumns.txt
The next step is to edit metacolumns.txt. In a default installation, this file is located in C:\ProgramData\STR\SuperADMIN\MetaData\MetaDataUtilities
Every classification and fact table in your SXV4 datasets will have a corresponding table created in the metadata database. metacolumns.txt specifies what columns need to be created in each one of these metadata tables. For each language you want to support you need one column that stores the translated name of the field or field value and one column that stores the translated description.
Each line in the file defines a column to create in the metadata database table, in the following format:
<column_name> <lang> <type> <length>Where:
<column_name> | The name of the column to create You can chose whatever name you like for the column. The column name is not displayed to end users in the clients, but you will see this in the RDBMS when you are populating your metadata, so you should choose something that will make it easy to remember which column is which (for example, | ||||||
|---|---|---|---|---|---|---|---|
<lang> | The language code. You must use either the two character ISO 639-1 language code (for example,
| ||||||
<type> | The column type, which must be one of the following:
| ||||||
<length> | The maximum length of the column (in characters). |
For example, the following sample will create columns for storing English and French metadata with up to 250 characters in the translated names and up to 500 characters in the descriptions:
en_name en name 250
en_desc en desc 500
fr_name fr name 250
fr_desc fr desc 500
The columns will be created in the metadata database in the same order as they are listed in metacolumns.txt, and the original field names from the dataset will automatically be populated into the first column listed in metacolumns.txt.
For this reason, you should make sure that the first column listed in metacolumns.txt is the name column for the original language of the dataset you are creating metadata for. In this example, the original dataset language is English, so the en_name column is listed first. If the dataset was in French, then fr_name should be the first column instead.
When you have finished editing metacolumns.txt, save your changes to the file.
You are recommended to save this file in the same location as the standard shipped file. If for any reason you want to save the file to a different location, you will have to find the line SET META_COLUMNS="metacolumns.txt" in BuildMetadataTemplate.bat and update it to point to your new filename and location.
Run BuildMetadataTemplate.bat
Once you have finished editing all three files, run the configuration batch file:
- Open a Windows Command Prompt and change to the directory where the batch file is located (if you installed to the default location, this will be C:\ProgramData\STR\SuperADMIN\MetaData\MetaDataUtilities).
- Run BuildMetadataTemplate.bat. It will use the information from your SuperSTAR datasets to create your metadata database tables.
- Wait for the process to complete and advise that it has "Finished populating RDBMS":
2013-07-29 14:28:40,596 [main] INFO au.com.str.metautilities.builders.BuildMetadataTemplate - Finished populating RDBMS. It took 3 secondsCheck your metadata database to confirm that the script has created the tables for all of the fact and classification tables in all of your chosen SuperSTAR datasets:
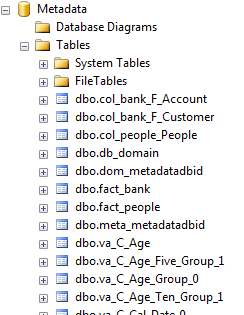
There should be one new table for every classification and fact table in your source datasets.
You can also check the individual tables. The script should have created each table with the columns you specified in metacolumns.txt. The original (untranslated) field names from the dataset will be in the first column that was specified in metacolumns.txt:
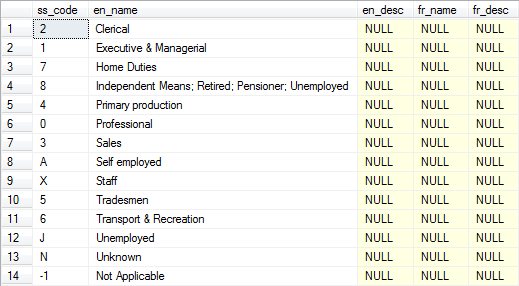
Step 3 - Create the Keyword Table
You need to manually create and populate an additional table in the metadata database that is not created by default. This table (keyword) stores translations for certain keywords used in SuperCROSS and SuperWEB2, such as "and", "by", "count", "mean" and "median".
- Create a table in your metadata database called
keyword. Create the following columns in the table:
ss_code
This column will contain the untranslated keyword codes. <lang>_name
These columns will contain the translated keywords for each language.
You will need to create one
<lang>_namecolumn for each language you want to support. Replace<lang>with the two character language code.Populate the table with the keywords and their translations. See Reference for a full list of keywords/codes that need to be translated.
The keyword table takes precedence over any keywords defined in the SuperWEB2 database_labels.properties files. If a keyword is defined in both places, then the value from the Metadata database will be used. If the keyword is not defined in the metadata database then SuperWEB2 will fall back to the value in the properties file.
Step 4 - Create the Folders Table
If you want to translate the names of folders you have created in SuperADMIN, then you will need to create an additional table to store the translated folder names:
- Create a new table in your metadata database. You can give this table whatever name you like. For example, you might call it
folders. Create the following columns in the table:
ss_code
This column will contain the SuperADMIN IDs of the folders that you want to translate. <lang>_name
These columns will contain the translated folder names for each language.
Create one
<lang>_namecolumn for each language you want to support. Replace<lang>with the two character language code.Populate the table with the folder IDs and their translations. For example:

- Open the
dom_<repository_id>table (where<repository_id>is the repository ID you chose when you configured BuildMetadataTemplate.bat). This table will contain a single record. You need to update the record to add the name of the folders table you just created to the
ss_fldrcolumn. This will tell the Metadata Server where to find your translated folder names. For example:
Step 5 - Configure the Metadata Server
The next step is to configure the SuperSTAR Metadata Server.
Before you can run Metadata Server, you need to set up an ODBC data source so that the SuperSTAR Metadata Server can connect to your metadata database. Follow these instructions to set up an ODBC data source to connect Metadata Server to your database.
Before starting the Metadata Server, you need to change some configuration settings in Metadata Server's metadata.config.xml. In a default installation, this file is located in C:\ProgramData\STR\SuperSERVER SA
Make a backup copy of this file before making any changes.
Open metadata.config.xml in a text editor.
Connection
Locate the Driver section of the file and edit the ConnectionString to match the details of your connection to the database, as follows:
- DSN is the Data Source Name that you specified when you set up the ODBC driver to your database (e.g. obdc_metadata).
- REP is the repository ID that you set in BuildMetadataTemplate.bat (e.g. metadatadbid).
- UID and PWD are the username and password to use to connect to the database.
- STRSCHEMA is optional. You can use this to specify a schema name for relational databases that require a table name qualification (for example, DB2). If the schema is specified it will be used to qualify the table names that are used by the ODBC layer. If this does not apply to your database, omit the STRSCHEMA parameter.
For example:
<KEY name="Driver">
  <KEY name="SimpleDriver">
    <STRING name="ConnectionString">DSN=odbc_metadata;REP=metadatadbid;UID=mydbuser;PWD=myuserpassword;STRSCHEMA=SCHEMA</STRING>
    <STRING name="Driver">SimpleMetaAccessDLL.dll</STRING>
  </KEY>
  <STRING name="ActiveDriver">SimpleDriver</STRING> <!-- Metadata Driver for directly connecting to ODBC -->
</KEY>
You should also confirm that the SuperADMINConnection details are correct for your environment:
<KEY name="SuperAdminConnection">
  <!-- Setup for mdcorbaserver -->
  <STRING name="SA_HOST">localhost</STRING> <!-- SuperADMIN host machine -->
  <NUMBER name="SA_PORT" value="9230"/> <!-- SuperADMIN port number machine -->
  <NUMBER name="MDServer_PORT" value="8005"/> <!-- Port number for mdcorbaserver -->
</KEY>
By default, Metadata Server is configured to use port 8005. This port is also used as the default shutdown port for Tomcat. If you are running Tomcat (SuperWEB2) on the same machine as Metadata Server, then you may choose to undertake any one of the following three options:
- change the metadata port in metadata.config.xml
- change the shutdown port configured for Tomcat in <tomcat_home>\conf\server.xml
- suppress reference to the Tomcat shutdown port in <tomcat_home>\conf\server.xml.
To change the metadata port: | To change the shutdown port configured for Tomcat: | To suppress reference to the Tomcat shutdown port: |
|---|---|---|
|
|
|
The MDServer_PORT setting configured here takes precedence over any port setting configured on the command line on in mdserver_network.properties. See IPv6 Support for more details.
When you have finished making changes, save metadata.config.xml.
Step 6 - Start the Metadata Server Application
By default the Metadata Server is not started and you must start it manually. Metadata Server will need to be running at all times, so when you have finished the configuration and setup, you may wish to use SuperSERVICE Manager to create a service that automatically starts Metadata Server when SuperSERVER starts.
To start Metadata Server manually, go to the Windows start menu and select SuperSTAR > SuperSERVER SA > Metadata Server SA.
Metadata Server will start and advise that it is connected to SuperADMIN:
15:06:22 2014/05/19, INFO, MetadataServer, "Registering with SuperADMIN...."
15:06:22 2014/05/19, INFO, MetadataServer, "SuperADMIN Host: Devel220"
15:06:22 2014/05/19, INFO, MetadataServer, "SuperADMIN Port: 9230"
15:06:22 2014/05/19, INFO, MetadataServer, "SuperADMIN URL: corbaloc::Devel220:9230/stradmin"
15:06:22 2014/05/19, INFO, MetadataServer, "Listening on port: 8005"
15:06:22 2014/05/19, INFO, MetadataServer, "Connected to SuperADMIN."
15:06:22 2014/05/19, INFO, MetadataServer, "Running"
15:06:22 2014/05/19, INFO, MetadataServer, "Version: 9.0.0.872.SV-ONWIN64FULL-BUILDSV-872-54987"
If Metadata Server does not run correctly, you may need to run it with administrator privileges.
If you see the error message assertion failed in the console or the logs then this is likely to indicate that the metadata server port is already in use by another application running on that machine. Follow the steps above to change the Metadata Server port to a different, unused, port.
Do not close this Window as this will stop the Metadata Server.
From version 9.9.3 onwards, a number of additional options have been added to Metadata Server to provide support on IPv6 environments. These can either be set on the command line or in a configuration file called mdserver_network.properties located in the SuperSERVER data directory. See IPv6 Support for more details and examples.
Step 7 - Change your SuperSERVER Datasets and Folders to be Multilingual
By default, your SuperSERVER datasets and folders do not connect to Metadata Server. To change this, you need to set the multilingual flag to true in SuperADMIN for every dataset and folder that you want to use with Metadata Server:
- Login to SuperADMIN.
For each dataset that you want to use with Metadata Server, you must run the following command at least once before changing the
multilingualsetting:CODEcat <dataset_id> fieldsThis primes the SuperADMIN catalogue with the list of display names of fields for this dataset in the original dataset language. Doing this ensures that the field names continue to be displayed in SuperADMIN in this language. If you do not do this before changing the dataset to be multilingual, then SuperADMIN will display multilingual field codes for this dataset instead (which will be similar to the following:
##col.fact.F_Customer.Age@@Age).Use the following command to change the
multilingualflag totrue:CODEcat {<dataset_id>|<folder_id>} multilingual trueFor example:
CODE> cat bank multilingual true Successfully updated multilingual property for database 'bank' > cat MyFolder multilingual true
Step 8 - Configure SuperCROSS
If you are using the SuperCROSS client, you need to make several configuration adjustments.
Configure the Client
By default, SuperCROSS is not configured to use Metadata Server. When you start SuperCROSS after making the change in SuperADMIN you will see symbols like ## in the dataset listing:
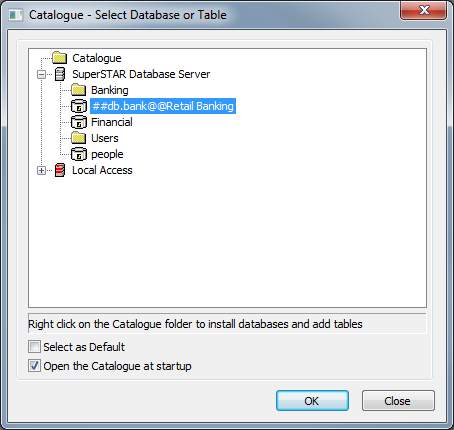
You need to change a configuration setting in SuperCROSS to enable the use of the Metadata Server:
- Start SuperCROSS and open any dataset or table.
- Select Edit > Options. The Options window displays.
- Select the Configuration tab and click Metadata.
Change Disabled to Enabled and click OK.
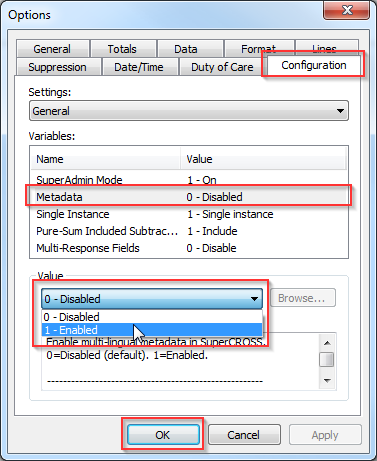
- Restart SuperCROSS to apply the change.
Configure SuperCROSS Languages
If you are using metadata to enable multilingual tables, then you need to edit the language definitions in the SuperCROSS metadata configuration file, metadata.config.xml. In a default installation, this file is located in C:\ProgramData\STR\SuperCROSS.
Although it has the same filename, this a different file to the one you edited in the earlier step. The previous one was the configuration file for Metadata Server. The one you need to edit now is the metadata configuration for SuperCROSS. It is located in the SuperCROSS ProgramData directory.
Make sure SuperCROSS is not running. Every time you close SuperCROSS it writes out its current metadata configuration to metadata.config.xml. If you edit the file while SuperCROSS is running, the changes will not be picked up by the client and when you subsequently close SuperCROSS your changes will be overwritten by the old settings from the client.
Make a backup copy of this file before making any changes.
Open the SuperCROSS metadata.config.xml file in a text editor, and locate the language map section, which will be similar to the following:
<KEY name="Lang-Map">
    <STRING name="ar">Arabic</STRING>
    <STRING name="cy">Welsh</STRING>
    <STRING name="de">German</STRING>
    <STRING name="en">English</STRING>
    <STRING name="fr">French</STRING>
    <STRING name="it">Italian</STRING>
</KEY>
This section lists all the available languages that can appear in the File > Table Language menu in SuperCROSS.
A language will appear in that menu and be available for the user to select if both of the following are true:
- The language is listed in the language map section of the SuperCROSS metadata configuration file.
- Columns for the language exist in the metadata database.
Update this section so that it includes a <STRING> element for each language that you have set up in your metadata database.
- Use the
nameparameter to specify the language code that you used in metacolumns.txt when you set up your metadata database. - Use the text within the
<STRING>element to control the text that will be displayed on the menu in SuperCROSS.
The supplied version of metadata.config.xml has all the language names in English. You may wish to change these so that the language names are in the individual languages, and show the English language name in brackets. For example:
<KEY name="Lang-Map">
    <STRING name="ar">العربية (Arabic)</STRING>
    <STRING name="cy">Cymraeg (Welsh)</STRING>
    <STRING name="de">Deutsch (German)</STRING>
    <STRING name="en">English (English)</STRING>
    <STRING name="fr">Français (French)</STRING>
    <STRING name="it">Italiano (Italian)</STRING>
</KEY>
When you have finished making changes, save and close metadata.config.xml.
Configure Super.ini
You are also recommended to make a change to one of the SuperCROSS configuration files. There are two changes you should make:
Disable the Create Table Metadata window. If you do not make this change, SuperCROSS displays a window similar to the following when you click on a dataset name:
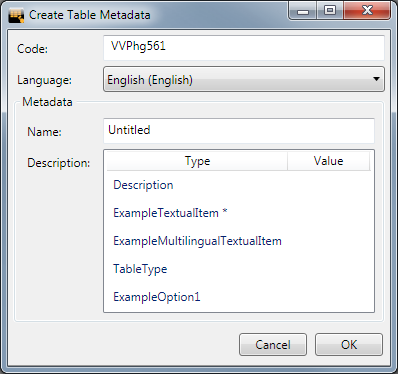
Disable the ability to edit metadata in SuperCROSS. By default users can edit metadata in SuperCROSS; their edits are not sent back to the Metadata Server, but an XML file containing the user's edited metadata will be saved alongside the table when it is saved.
You are particularly recommended to make this change if you will be creating TXD files in SuperCROSS for use in SuperWEB2. SuperWEB2 does not support saved TXD files with metadata edited in SuperCROSS.
To make these changes, you need to edit the file super.ini. In a default installation this file is located in C:\ProgramData\STR\SuperCROSS.
Make a backup copy of this file before making any changes.
- Make sure that SuperCROSS is not running.
- Open super.ini in a text editor.
Search for the
[Metadata]section:CODE[Metadata] AllowEditMetadata=1 NotShowMetaDlg=0The
[Metadata]section may not appear in the super.ini file; if it does not appear in the file, you will need to add this section at the end of the file.Set the value of
AllowEditMetadatato0to prevent users from editing metadata in SuperCROSS, and set the value ofNotShowMetaDlgto1to turn off the Create Table Metadata window:CODE[Metadata] AllowEditMetadata=0 NotShowMetaDlg=1- Save and close super.ini.
Step 9 - Create and Verify the actual Metadata values
Now that metadata is configured, you can edit your actual metadata values in the database. Simply add the relevant descriptions and translations.
The following examples show some ways you can use metadata.
Example: Adding a Description
The following screenshot from SQL Server shows some additional information added to the description field for one of the values of Occupation:
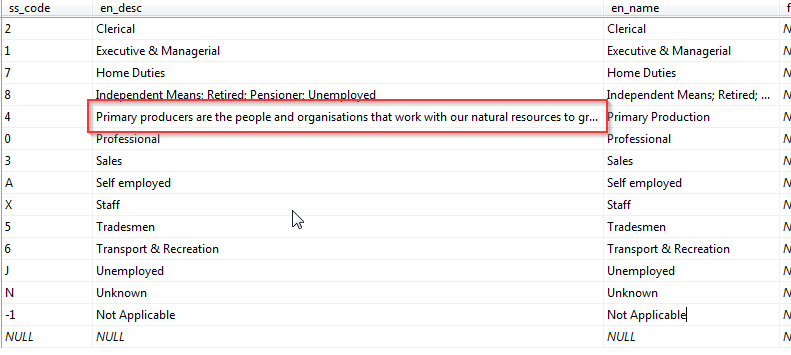
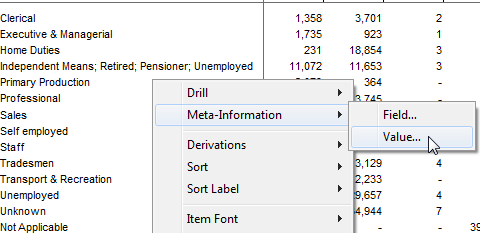
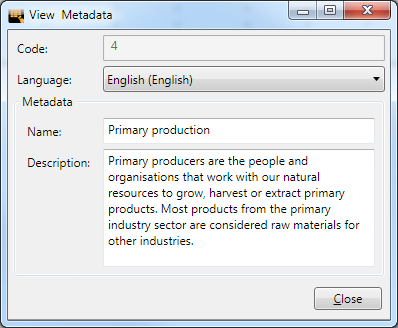
You can view this information in SuperCROSS by right-clicking the value and selecting Meta-Information > Value.
Example: Adding Multilingual Metadata
The following screenshot from SQL Server shows the addition of some French translations:

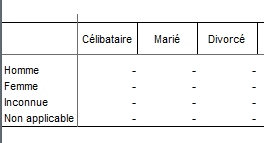
In SuperCROSS, you can use the File > Table Language menu to change the table language:
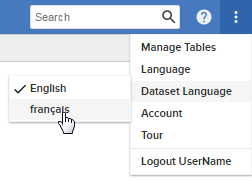
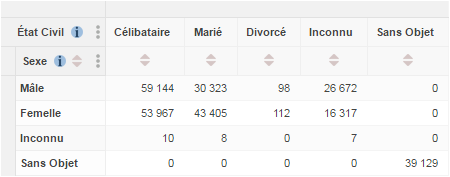
| In SuperWEB2, you can use the option on the menu to select the dataset language:
|
If you make changes to the metadata database, you must either restart Metadata Server, or use the supplied metadata cache flush tool.


