Add a New Language
This section describes what to do if you have followed the instructions and set up metadata already and now want to add an additional language to your deployment.
Do not re-run the metadata configuration scripts, as this will replace your existing populated metadata database.
To add another language to an existing metadata database, simply follow these steps:
Step 1 - Add the Language to your Metadata Database
Go to your metadata database and find the table called meta_<repository_id> (where <repository_id> is the repository ID you used when you set up the metadata database).
You will see that this table contains the details of the columns that exist in your metadata database (this will match the columns you set up in metacolumns.txt when you ran the batch file that created the metadata database):

For each new language you want to add, add new name and description rows to this table. For example, to add translations for Spanish:
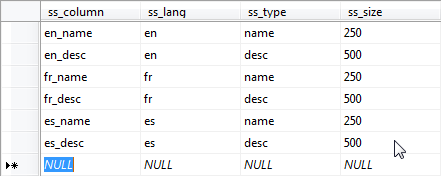
ss_lang column (for example, en, fr, de), or a combination of the two character ISO 639-1 language code and the two character ISO 3166 country code, separated by a hyphen (for example, fr-CA, fr-FR, zh-CN).
Step 2 - Add Columns and Metadata to Each Table
For each table that you want to translate, you now need to add new columns for your new language. In this case we will need to add the columns es_name and es_desc:
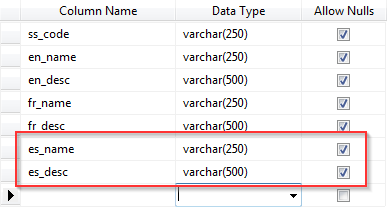
Once you have added the columns, simply populate those columns with the metadata for that language. For example:

If there are any tables that you do not add the new columns and translations to, the client will simply display the values from the default language (in the examples shown here, the default is English).
Step 3 - Update Metadata Config (SuperCROSS Only)
If you are using SuperCROSS, you need to check that the new language is specified in the SuperCROSS metadata configuration file, metadata.config.xml. In a default installation, this file is located in C:\ProgramData\STR\SuperCROSS
Make sure SuperCROSS is not running. Every time you close SuperCROSS, it writes out its current metadata configuration to metadata.config.xml. If you edit the file while SuperCROSS is running, the changes will not be picked up by the client, and when you subsequently close SuperCROSS your changes will be overwritten by the old settings from the client.
Make a backup copy of this file before making any changes.
Open metadata.config.xml in a text editor, and locate the language map section, which will look similar to the following (in this example the file has been customised from the default to show the translated language names and the English language names in brackets):
<KEY name="Lang-Map">
    <STRING name="ar">العربية (Arabic)</STRING>
    <STRING name="cy">Cymraeg (Welsh)</STRING>
    <STRING name="de">Deutsch (German)</STRING>
    <STRING name="en">English (English)</STRING>
    <STRING name="fr">Français (French)</STRING>
    <STRING name="it">Italiano (Italian)</STRING>
</KEY>
If your new language is not already specified, add it to the list. Make sure the value of the name attribute matches the code you used in the ss_lang column:
<KEY name="Lang-Map">
    <STRING name="ar">العربية (Arabic)</STRING>
    <STRING name="cy">Cymraeg (Welsh)</STRING>
    <STRING name="de">Deutsch (German)</STRING>
    <STRING name="en">English (English)</STRING>
    <STRING name="fr">Français (French)</STRING>
    <STRING name="it">Italiano (Italian)</STRING>
    <STRING name="es">Español (Spanish)</STRING>
</KEY>
This step is not required for SuperWEB2. SuperWEB2 automatically sets the language names based on the language code.
Step 4 - Update the Keyword Table
Update the keyword table in your metadata database so that it includes the translations of the keywords in the new language:
- Add a
<lang>_namecolumn to the keyword table (replace<lang>with the character code of the language you are adding). - Populate this column with the keyword translations. See Reference for details of the required keywords and where they are used in SuperCROSS and SuperWEB2.
Step 5 - Restart the Metadata Server and Client
Restart Metadata Server, the SuperWEB2 service and SuperCROSS (as applicable) to apply the change.
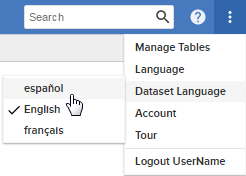
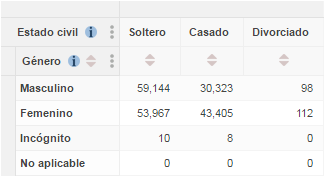
Check that your changes have been picked up in the clients:
SuperCROSS

SuperWEB2
