Add Datasets and Tables
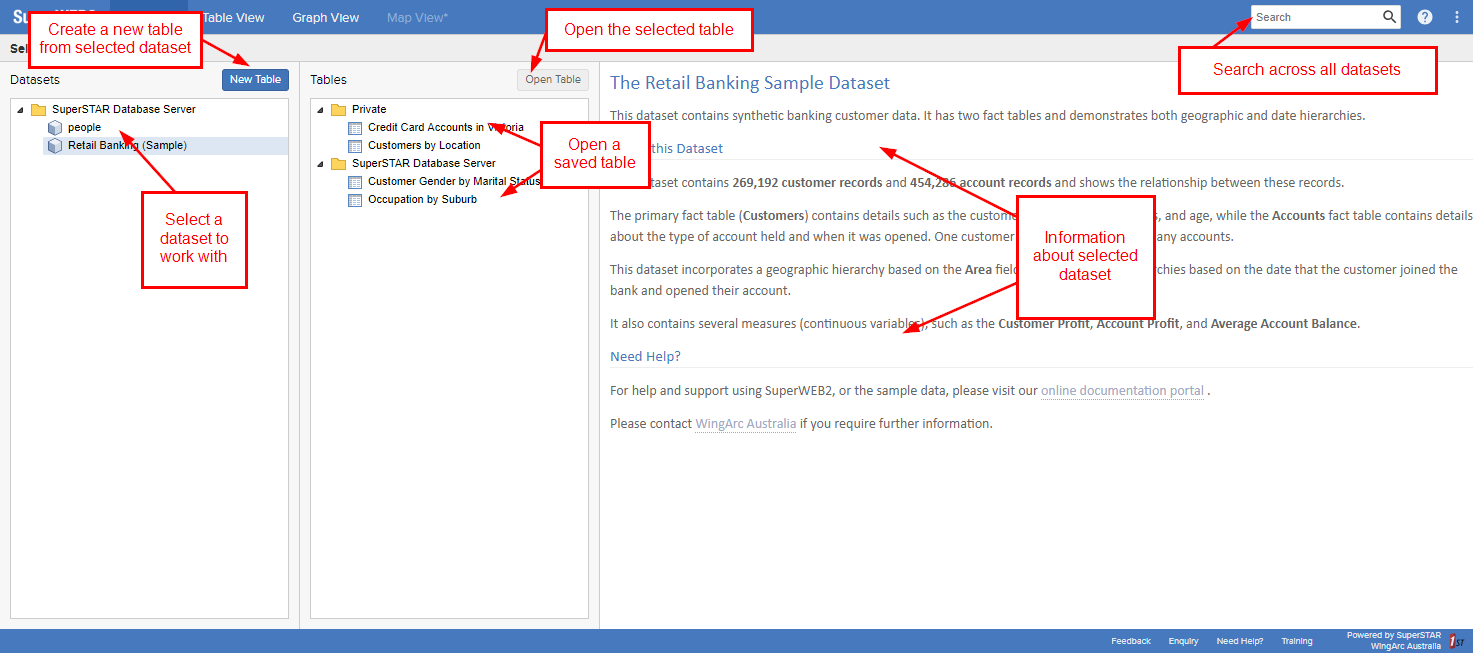
On login, SuperWEB2 displays the catalogue of available data, where users can select a dataset or saved table to work with:

The Datasets list displays all the datasets installed on the SuperSERVER that the logged in user has permission to access.
- The Tables list displays saved tables for the currently selected dataset. Saved tables include:
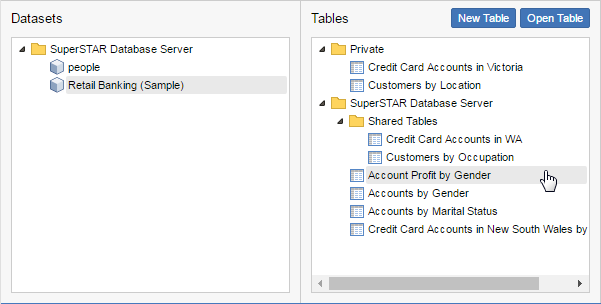
- Tables in the Private folder; these are tables created by the currently logged in user, and are only accessible to that user.
- Shared tables. These are user-created tables that are shared between multiple users. You can set folder permissions in SuperADMIN to control which users can create shared tables and which users have access to them (learn more). It is also possible for an administrator to add and manage shared tables from within SuperADMIN.
- Saved system tables installed on the SuperWEB2 server. All users will be able to access these tables, as long as they have access to the dataset the table is based on.
 | For example, in the catalogue shown here:
|
Add a Dataset to the SuperSERVER
Use the cat command in SuperADMIN to manage the datasets installed on the SuperSERVER and control user access. Learn more about managing the catalogue.
It is also possible to configure the order in which datasets are sorted when they display in SuperWEB2. Learn more.
If you add, remove, or update a dataset, you must update the search index file, so that it is synchronised with the datasets on the server.
Change the Name of the SuperSERVER
By default, your SuperSERVER instance will appear in the SuperWEB2 catalogue as SuperSTAR Database Server. To change this, use the following command in SuperADMIN:
cat root displayname <new_display_name>For example:
> cat root displayName "My SuperSTAR"
>
Allow Users to Save Shared Tables
In the above example, there are two shared tables that have been saved by SuperWEB2 users. If you want to allow your users to save tables that are shared with other users, then you will need to create folders in SuperADMIN and configure user permissions.
Learn more about configuring access to shared tables in SuperWEB2.
Add a System Table
This section describes how to save TXD system tables on disk for use in SuperWEB2. It is also possible to upload these TXD files to the user data repository through SuperADMIN. This makes the table available as a shared table, and is the recommended approach for adding tables to SuperWEB2. See Configure Folders and Shared Tables for more information.
To add a saved system table to SuperWEB2:
Use SuperCROSS to define the structure of the table, and save it in Textual Table Definition (.TXD) format.
Please note that some table structures are not supported by SuperWEB2. Refer to the TXD Reference for more details about TXD compatibility when opening a table saved in SuperCROSS in SuperWEB2.
In addition, if you are using annotations then there are some additional restrictions on TXD support. See Configure Display of Annotations for more information.
Choose carefully when selecting the filename. This is what will be displayed to users in the list in SuperWEB2, so you should choose something that describes the table contents.
- Copy the TXD file to <tomcat_home>\webapps\webapi\WEB-INF\resources\txd (you will need to create the txd directory if it does not already exist).

- Open SuperWEB2 in your browser, select the dataset and check that the table appears in the Tables list.
Using TXDs Created Prior to SuperCROSS 9.0
SuperSTAR 9.0 added full Unicode support. This means that the SuperSTAR clients now support all characters and languages, regardless of the user's system codepage or locale.
You can continue to use TXDs that were created in earlier releases. However, if your TXDs were created in a version of SuperCROSS prior to version 9.0, then you may need to make some configuration changes in order to add these as saved system tables. This depends on the character set used in the TXDs.
If your TXDs contain only English/ASCII characters then they will work automatically with no further changes.
If your TXDs contain other characters, then you have two choices:
Option 1: Set the TXDEncodingType
There is a configuration setting in <tomcat_home>\webapps\webapi\WEB-INF\web.xml called TXDEncodingType. If there is a particular system codepage that fully supports all the characters in your TXDs then you can change this setting to match that codepage and your TXDs will work automatically. You will need to restart Tomcat or the SuperWEB2 service after making this change to web.xml.
Option 2: Convert the TXDs
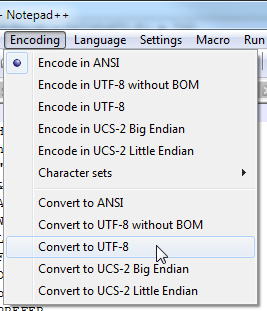
If setting the codepage in web.xml is not an option for you, then you will need to convert the encoding of the TXD files to UTF-8 with a Byte Order Mark (BOM). One way to do this is to use a text editor such as Notepad++. Open the TXD file in Notepad++ and select Encoding > Convert to UTF-8.

Repeat this step for every TXD file that you want to use in SuperWEB2.
Configure a Default Table for your Datasets
You can configure default tables for each of your datasets that will open automatically whenever a user opens that dataset.
Learn more about configuring default tables in SuperWEB2.
Add User Defined Fields
If you have created user defined fields in SuperCROSS, then you can add these to the SuperWEB2 server and they will be available for users to select in the field tree, just like any other field.
Learn more about adding user defined fields to SuperWEB2.
Configure the Information Pane
On the right of the catalogue, the Description pane displays information about the currently selected dataset.
You can add your own custom text to this section by editing an HTML file located on the SuperWEB2 server.
