Configure the Console
The SuperADMIN console is the command-line application used to administer SuperSERVER. This section includes some tips for changing the console properties to make it easier to work with.
Configure the SuperADMIN Console to Run as Administrator
In order to function properly, the SuperADMIN Console requires write access to its program data directory. By default this is located in C:\ProgramData\STR\SuperADMIN
There are two options for enabling this issue: either you can update the permissions on the C:\ProgramData\STR\SuperADMIN directory so that all users of the console have write access to this directory, or you can run the console with Windows administrator privileges.
If the first option is not available to you, then you may wish to configure your shortcut to the SuperADMIN Console so that it always launches with administrator privileges:
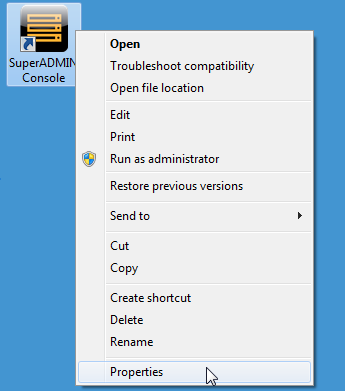
Right-click the SuperADMIN Console shortcut (either in the start menu or on your desktop) and select Properties:

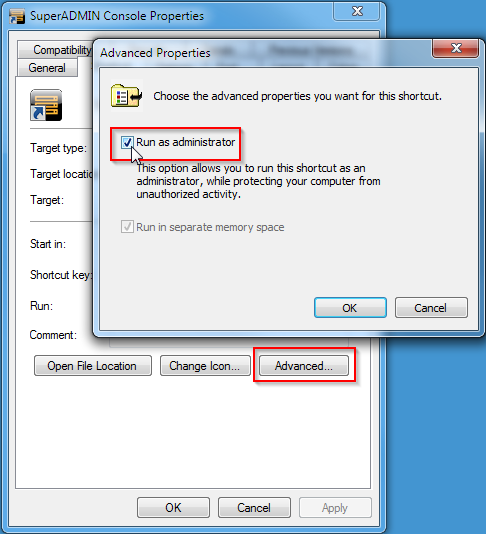
The SuperADMIN Console Properties dialog displays.
- Click Advanced. The Advanced Properties dialog displays.
Select the Run as administrator check box.

- Click OK to close the Advanced Properties dialog and click OK to close the SuperADMIN Console Properties dialog.
The SuperADMIN Console will now run as administrator when you launch it using this shortcut.
Depending on how your system is configured, you may see a User Account Control warning when you launch the console, asking "Do you want to allow the following program to make changes to your computer?"
You must click Yes to launch the SuperADMIN console with administrator privileges.
Configure the Default Properties of the Windows Command Session
SuperADMIN console uses the windows command session. The following are some suggested changes you may want to make to change the look and feel of the cmd window:
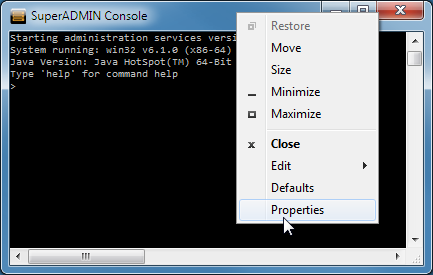
To change the properties, right-click the title bar and select Properties.

| Suggested Change | Details | How |
|---|---|---|
| Enable QuickEdit | QuickEdit mode lets you copy from the command prompt by intuitively dragging and right-clicking with the mouse. You can also paste the contents of the clipboard to the command line by right-clicking with nothing selected |
|
| Increase the command history buffer | The Command History option allows you to use the arrow keys to access and repeat previous commands. By increasing the size of the buffer you can access more commands from the history. |
|
| Change the Font | Choosing a non-raster font avoids some problems that might occur with the display of special characters. Consolas is a good choice. Microsoft introduced the Consolas ClearType font to improve your on-screen reading experience especially when reading or writing programming code. Consolas, like Courier, is a fixed-width font meaning that all letters are the same width. |
|
| Increase the window size | Set the Window Size so that you have a comfortable height and width for your screen – this may take a little experimentation. |
|
| Change Text and Background colours | The default font colour for screen text is grey, which is not the clearest choice available. You may like to change that. You may like to set the background colour to something other than black. This helps to distinguish the console from other command windows you may have open. |
|
When you have finished setting your preferred options, click OK to save the changes and close the Properties dialog.
Useful shortcuts
There are also a few helpful shortcuts that you may not know:
- Use the arrow up and arrow down keys the navigate back and forward through the command history. This can be useful if you want to repeat a previous command without retyping the whole thing.
- Press F7 to display a list of your command history.
- You can drag and drop files or directories from an Explorer window into a command prompt; this inserts the quoted path as if you had manually typed or pasted it.
- Use the Tab key to complete partially typed file or directory names.
