Branding Excel and CSV Templates
SuperWEB2 users can download data from Table View in a variety of formats:

The templates for Excel and CSV downloads are located in <tomcat_home>\webapps\webapi\WEB-INF\templates:
| File | Used For |
|---|---|
| Template.csv | CSV downloads from Table View. |
| Template.csvString | CSV string value downloads from Table View. |
| XLS_Template.xls | Excel 2003 downloads from Table View. |
| XLSX_Template.xlsx | Excel 2007 downloads from Table View. |
See Branding SDMX Downloads for information about changes you can make to the SDMX download formats.
To use your own branding for CSV and Excel downloads, simply replace the existing template file with your own version, as follows:
CSV Templates
The two CSV templates are plain text files. They can contain any content you want, but must include the string #TABLE# (this will be replaced with the table contents).
For example:
Customised SuperWEB2(tm) CSV Download File Format

#TABLE#

(c) Copyright WingArc Australia 2018
Excel Templates
The easiest way to create your own Excel templates is to use the existing version as a basis and then customise that, rather than starting from scratch.
Your completed template file must contain the following three work sheets:
| Work Sheet | Description | Example | ||||||||||||||||||||
|---|---|---|---|---|---|---|---|---|---|---|---|---|---|---|---|---|---|---|---|---|---|---|
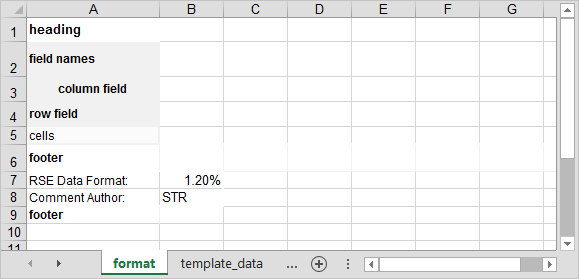
| format |
The contents of this work sheet do not appear in the downloaded file. It is used to define the formatting for the downloaded table. For example, you can change the font, font size, as well as the background colours and borders:
|
| ||||||||||||||||||||
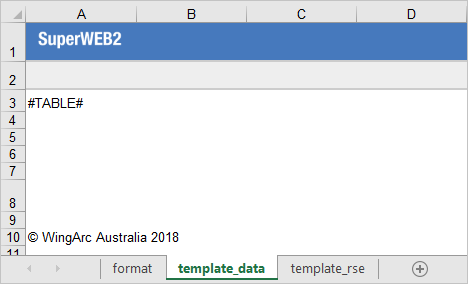
| template_data |
This work sheet will be used as the template for a standard table download. It can contain any content you like, but must include the string #TABLE# somewhere on the worksheet. SuperWEB2 will replace #TABLE# and up to five rows after that with the table data and associated messages such as the table title and any annotations. If you want to include any messaging at the bottom of your download (such as a copyright statement or attribution) then you should make sure it is far enough down your template file so that it does not get overwritten by the table data. |
| ||||||||||||||||||||
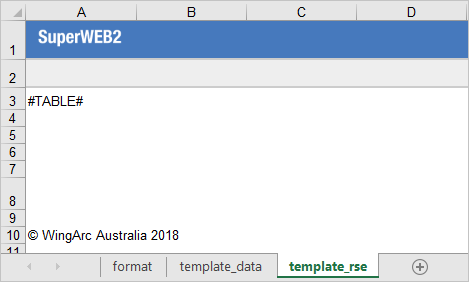
| template_rse |
This is an alternative template that will be used for the download if the Relative Standard Error (RSE) feature is enabled. In this case the RSE data will be included in the download in a separate work sheet. As with the standard template it must include the string #TABLE# somewhere on the sheet. SuperWEB2 will replace this and up to the following five rows with the table data and messages. |
|
Make sure you save your Excel templates using the correct file format. Use the File > Save As option in Excel, and select either the 2003 or 2007 file format from the Save as type drop-down list.
Note About "Cloning sheets with page setup is not yet supported" Warning Message in Logs
When downloading Excel 2007 files for tables containing wafers, you may notice warning messages similar to the following in the SW2.log file:
[SUPERWEB2 WARN ]: 2024-11-26T10:43:26,902--SessionId[F65B31EF58BE323D13E0CB205288C9C5]--Cloning sheets with page setup is not yet supported.--XSSFWorkbookThis warning message is generated if the Excel template file has an internal pageSetup tag. This tag is typically added by Excel automatically when making changes to the template. The message will usually be repeated multiple times in the logs (once for every item in the wafer).
This is a warning message only; it does not affect the output file and can be safely ignored.
If you wish to stop this message from being generated in the logs, you have two choices:
- Option 1 - Remove the
pageSetupTagfrom the Excel Template: manually edit the Excel 2007 template to remove the tags, although be aware that Excel will typically add them back to the file if you edit the template in Excel in future, so you may need to repeat these steps whenever you make changes to the template; or - Option 2 - Change the Logging Level to Hide Excel Warnings: this will avoid the need to remove the tag from the template every time you make a change, but will cause other Excel-related warnings to also be excluded from the logs.
Detailed steps for both of these options are listed below. Alternatively, you can simply ignore these messages.
If you are using Job Queue Manager (JQM), then it has its own copy of the download templates (located in its WEB-INF\templates folder). You will need to apply any changes you make to the JQM copies of the templates.
Option 1 - Remove the pageSetup Tag from the Excel Template
To remove the tag, you need to extract/unzip the contents of your Excel template, manually edit the underlying XML files in a text editor, and then ZIP the files back up:
- Locate your Excel 2007 template in <tomcat_home>\webapps\webapi\WEB-INF\templates.
- Use a tool like 7-Zip or WinRAR to unzip the contents of the .xlsx file into a folder.
- Go to the xl/worksheets folder within the extracted files and locate the .xml files. There will be one XML file in this folder for each worksheet in the template, with names like sheet1.xml, sheet2.xml, etc.
-
Open each XML file in a text editor and delete the entire
pageSetuptag, which will be similar to the following:CODE<pageSetup paperSize="9" orientation="portrait" r:id="rId1"/> - Save your changes to the XML files.
- Select all the extracted files and folders (but not the parent folder) and compress back into a new ZIP file.
- Rename the ZIP file to XLSX_Template.xlsx and replace the previous template in <tomcat_home>\webapps\webapi\WEB-INF\templates.
Option 2 - Change the Logging Level to Hide Excel Warnings
To change the logging settings:
- Open <tomcat_home>\webapps\webapi\WEB-INF\classes\log4j2.xml in a text editor.
-
Locate the following section of the file, near the bottom:
CODE<Logger name="org.jboss.resteasy.resteasy_jaxrs.i18n" level="ERROR"/> -
Add the following additonal logger after the previous entry:
CODE<Logger name="org.apache.poi.xssf.usermodel" level="ERROR"/> - Save the log file and restart Tomcat or the SuperWEB2 service to apply the change.


