Upgrade
This section explains how to upgrade an existing installation of SuperSERVER to Release 9.
Notes
- SuperSERVER requires a 64-bit operating system.
- These instructions apply to upgrades of the SuperADMIN (SA) versions of SuperSTAR (release 6.5 onwards) only. If you are upgrading from a non-SA version, or from an SA version prior to release 6.5, please contact WingArc Support.
- These instructions describe the upgrade of the core SuperSERVER components only (not the client applications SuperCROSS, SuperVIEW and SuperWEB2).
When you upgrade to version 9.9 or later, SuperADMIN will automatically migrate user data from an XML file to a relational database. By default, it will migrate to an embedded H2 database, but you have the option to move to another RDBMS, such as Oracle, SQL Server or DB2. Please contact support for advice if you are considering making this change.
To upgrade your SuperSERVER installation, you need to complete a number of tasks:
Step 1 - Read These Instructions In Full
Read these instructions in full before starting. In addition, we recommend you also review the following instructions before you start the upgrade process:
Step 2 - Schedule Service Outage and Advise Users
The upgrade will involve a service outage. You should plan carefully when to complete the upgrade and advise your users of the outage period when SuperSERVER will not be available.
Step 3 - Record SuperSERVER Startup Parameters
Make a note of any custom port or codepage settings you are using with your SuperSERVER deployment. Refer to Port Usage for details of the default ports.
To find the ports and codepage settings in use on your system, do the following:
SuperADMIN Ports
Login to the SuperADMIN console and type the command domain:
> domain
[Host : localhost]
RMI Port     = 9235
RMI Registry = 9236
Corba Port   = 9230
SuperSERVER Port
Review the SuperSERVER log file: scsa.logs.txt. This will typically be located in C:\ProgramData\STR\SuperSERVER SA\logs (Windows) or STR/SuperSERVER_SA/logs (Linux).
Locate a line similar to the following, which indicates the port number (9232 in this example):
09:49:06 2013/08/02, INFO, AUDIT_DataServer, "Accepting CORBA Client Requests on Address inet:MACHINENAME:9232" Metadata Server Port
If you are using Metadata Server, check what port it is using by reviewing its configuration file: metadata.config.xml. This will be located in C:\ProgramData\STR\SuperSERVER SA (Windows) or STR/SuperSERVER_SA (Linux).
The port number is indicated by the following line:
<NUMBER name="MDServer_PORT" value="8005"/> <!-- Port number for mdcorbaserver -->Codepage
Review the SuperSERVER log file: scsa.logs.txt. This will be located in C:\ProgramData\STR\SuperSERVER SA\logs (Windows) or STR/SuperSERVER_SA/logs (Linux).
Locate a line similar to the following, which indicates the codepage (1252 in this example):
09:49:05 2013/08/02, INFO, AUDIT_DataServer, "Code page set to: 1252" SuperSTAR 9 provides full unicode support. When you upgrade to version 9 or above, it will not be necessary to set the SuperSERVER codepage unless you need to support old SXV4s (generated prior to version 8) that use a different codepage to the current system locale. See Unicode for more details.
SuperSERVER Performance Settings
Check the SuperSERVER performance configuration by running the following command in SuperADMIN:
server <id>In particular, make a note of the xtabProcessors and numberThreadsPerCrossTab settings. You will need to re-apply any changes to these settings following the upgrade.
Step 4 - Export the Configuration Server Settings
This step is only required if the version you are upgrading from is SuperSTAR 9.0 or higher (for example it is required if you are upgrading from version 9.0 to 9.5). It is not required if you are upgrading from SuperSTAR 8 or earlier.
In the SuperADMIN console, run the following command:
cfg save <filename>This command saves any configuration settings you have applied using the cfg command in SuperADMIN. Replace <filename> with the full path to a file on disk where you want to save the settings. Do not use quotes even if the path contains spaces.
For example:
cfg save D:\Backup Directory\configuration settings.jsonAfter you run the command, check that the file has been created in the specified location. You will need to use this file in a later step to reimport your configuration settings.
Step 5 - Stop SuperSERVER and its Components
Before starting the upgrade, you must stop any of the SuperSERVER components if they are running, including:
- SuperSERVER
- SuperADMIN Server
- SuperADMIN Console
- Metadata Server (if used)
- Tomcat (if used for SuperWEB2)
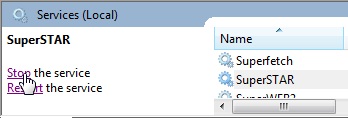
If you are upgrading a Windows installation, and SuperSERVER is running as a Windows service, go to the Services console and stop the service:

Step 6 - Backup the Current System
It is a good idea to take a complete backup of the host before proceeding. If it is not possible to take a complete backup, backup the SuperSTAR components described in Backup Strategy.
Step 7 - Copy SuperSERVER Files to a Temporary Location
| Windows | For Windows deployments, copy the contents of the following directories (or the equivalent directories if you are not using the standard installation location) to a separate temporary location:
You will use these files to restore some of your previous configuration settings in a later step. |
|---|---|
| Linux | On Linux, move or rename the following directories:
This allows you to install the new version to the same location. You will use the existing files in a later step to restore some of your previous settings. |
If you are using SuperWEB2, copy the Tomcat instance that hosts it and any configuration files that reside outside the Tomcat structure. If you have front-ended these products with Apache or IIS or similar, ensure that this configuration is also backed up.
Step 8 - Uninstall SuperSERVER (Windows Only)
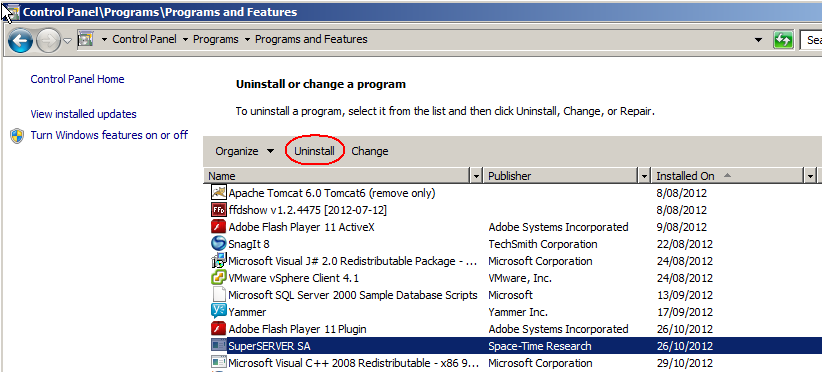
If you are upgrading a Windows deployment, go to the Windows Control Panel and uninstall SuperSERVER (and SuperSERVICE Manager if it is installed).

Wait for the uninstall process to finish, then delete the following directories if they are still present on your system:
- C:\Program Files\STR\SuperADMIN
- C:\Program Files\STR\SuperSERVER SA
- C:\ProgramData\STR\SuperADMIN
- C:\ProgramData\STR\SuperSERVER SA
If you installed to a non standard location, you need to find and delete the equivalent directories on your system.
The uninstall process does not remove the directories by default if they contain any modified files. This is to avoid losing your configuration settings. You can safely delete them now because you have already backed up your configuration settings by making a copy of these directories in the previous step.
Step 9 - Install SuperSERVER
Follow the installation instructions to install the new version of SuperSERVER:
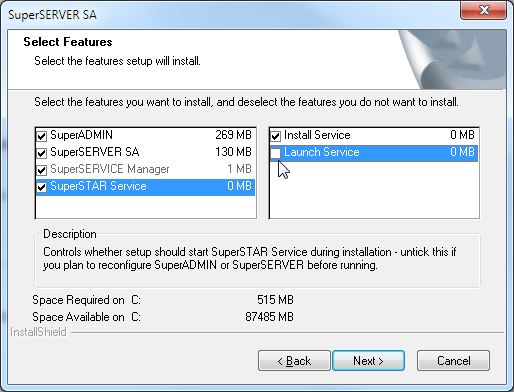
On Windows, the installation process will automatically install and start the SuperSTAR Windows service. As described in the next step, you will need to stop this service before continuing with the upgrade process. As an alternative to allowing the installation process to start the service, and then stopping it, there is an option you can use in the installer that prevents it from starting the service:
- When you are prompted to select the install type, choose the Custom option.
When you get to the Select Features screen, select SuperSTAR Service and clear the Launch Service check box:

This step is particularly important if you are upgrading from a version earlier than 9.9. From 9.9 onwards, SuperADMIN automatically moves its data storage from XML to an RDBMS when it first starts up. If you allow the service to start up automatically then the migration will happen before you have copied your existing catalogue XML files back in to your deployment.
- Complete the rest of the install steps as normal.
Step 10 - Stop the SuperSTAR Service (Windows Only)
Unless you specifically selected the option not to start the service, the installation process will have automatically created and started the SuperSTAR service.
Go to the Windows Services console and stop the service:

It is very important to stop the service before proceeding. The remainder of the upgrade steps will not work correctly if the service is still running.
If you are upgrading from a version prior to 9.9 and you have allowed the service to start up, then this will affect the migration of your users and datasets. See the troubleshooting steps in Step 12 below for advice on resolving this.
Step 11 - Import Your Settings
The next step is to import your settings from the old deployment to your new SuperSERVER system.
Copy across your saved configuration settings as follows:
| Settings | What You Need To Do | |||||||||||||||||||||
|---|---|---|---|---|---|---|---|---|---|---|---|---|---|---|---|---|---|---|---|---|---|---|
| Dataset Catalogue |
If any of your custom SXV4 datasets were stored within the C:\ProgramData\STR directory structure then you will need to copy these back into the new installation also. If any of your SXV4s were created prior to version 8.0 of SuperSTAR, and they contain non English/ASCII characters, then you may need to change the system locale or SuperSERVER codepage in order to use them with SuperSERVER 9.0 or above. See Unicode for more details. | |||||||||||||||||||||
| Configuration Server | The configuration server was added in SuperSTAR 9.0. If you are upgrading from a version of SuperSTAR that is older than 9.0, then you will need to make a change to the administrationServerCatalog.xml file that you have just copied to C:\ProgramData\STR\SuperADMIN\server\data\.repository (Windows) or /STR/SuperADMIN/server/data/.repository (Linux) in your new installation, as this will have replaced the new version of the file that comes with the installation.
| |||||||||||||||||||||
| Macros | Compare the newly installed macros directory (either C:\ProgramData\STR\SuperADMIN\console\macros on Windows or /STR/SuperADMIN/console/macros on Linux) with your backed up copy of the old macros directory. Copy any user-defined macros that appear in the backup but not in the new installation. Do not replace any of the STR-supplied macros that have been installed with the new version. Their function may have been amended in the new version. | |||||||||||||||||||||
| Log Files | If required, copy your log files from the previous installation for reference and analysis. The log files are located in the following directories:
| |||||||||||||||||||||
| CORBA Settings | If the server is multi-homed, verify that the CORBA files and settings are present and correct. See Multi-Homed Hosts for more information. | |||||||||||||||||||||
| API Plugins | If you were using any STR-supplied API plugins, copy these from the new version rather than reinstalling the previous version. The plugins must be copied to the same location as the SuperSERVER executable (scsa.exe). The default location is C:\Program Files\STR\SuperSERVER SA (Windows) or /STR/SuperSERVER_SA (Linux). If you have written any custom API plugins you will also need to copy these back into the new installation. | |||||||||||||||||||||
| SuperADMIN Configuration for Secure LDAP | If you have implemented secure LDAP on your system, then you will have made changes to add additional properties to the SuperADMIN java-options.txt file. Reapply these changes to the instance of java-options.txt in your new installation. | |||||||||||||||||||||
| SuperSERVER Configuration | Compare the SuperSERVER configuration files saved from the previous installation with the configuration files installed by the new version. Modify the new files to reflect any configurations that you changed in the previous version. This includes configuration files for logging, network properties, metadata configuration, search index construction, metadata database creation. The default files and locations are:
You should also check files to which these utilities refer (for instance, the BuildMetadataTemplate script refers to databases.txt and metacolumns.txt in the same directory).
Do not simply copy the files from the previous installation, as they may have been updated in the new version. Compare the old and new files to identify your own changes, and apply these to the new files.
In version 9.13, the logging functionality has changed from Log4j to Log4j 2. When upgrading from an earlier version you will need to reapply any logging configuration to the new Log4j 2 files. You will not be able to reuse your existing Log4j configuration files directly. | |||||||||||||||||||||
| SuperSERVER Performance | Follow the steps in Performance Considerations - SuperSERVER to configure suitable multithreading settings for your upgraded deployment. | |||||||||||||||||||||
| Search Index | Following the upgrade, you should rebuild the search index for your datasets. | |||||||||||||||||||||
| JDBC Drivers | Check for any additional JDBC drivers from the backup of the C:\Program Files\STR\SuperADMIN\server\lib\ (Windows) or STR/SuperADMIN/server/lib/ (Linux) directory. If you have added drivers (for example, because you are using a non-default RDBMS for the user catalogue) then you will need to copy these to the C:\Program Files\STR\SuperADMIN\server\lib\ (Windows) or STR/SuperADMIN/server/lib/ (Linux) directory in the new version. The location for these drivers changed in version 9.13 from \lib\endorsed\ to \lib\ If upgrading from version 9.12 or older, copy the additional JDBC drivers from C:\Program Files\STR\SuperADMIN\server\lib\endorsed\ in the old version to C:\Program Files\STR\SuperADMIN\server\lib\ in the new version. If upgrading from version 9.13 or later, copy the additional JDBC drivers from C:\Program Files\STR\SuperADMIN\server\lib\ in the old version to C:\Program Files\STR\SuperADMIN\server\lib\ in the new version. |
If you have moved to a new host:
- Check all your configuration files for any references to the old host name, and replace with the new host name.
- Check for and change any file paths that are no longer correct.
- Restore any external databases from the old server to the new server. For example:
- Backup and restore the SuperWEB2 User Data Repository onto the new server.
- Copy the annotations repository across to the new host (you can simply copy the .sqlite.db files across, as long as the filename and location is preserved)
Step 12 - Verify the Installation
Start each component individually, so that you can check the startup messages and verify that everything is working correctly.
Start SuperADMIN Server first, and wait for it to start completely before starting SuperSERVER and any client applications.
You must run SuperADMIN Server and SuperSERVER as a user with permissions to write to the STR program data directories (such as an administrator user). On Windows, right-click the applications and choose the Run as administrator option from the menu.
Also start the Metadata Server if your installation requires it.
When all components have started, verify the basic functionality. For example, load one of the clients and confirm that you can log in and perform basic cross tabulations.
On Windows, when you are satisfied that the applications are working:
- Stop the components.
- Restart the Windows service.
- Load one of the clients and confirm that you can log in and perform basic cross tabulations.
The first time the Windows service is started following the upgrade it will take slightly longer to start up than during regular operation. You may need to wait a short period of time after starting the service before you will be able to log in using one of the clients. If you see the error message Unable to load database in the client, wait for the service to complete its initial configuration and then try again. You may need to restart the client to refresh the connection to the server.
Users and Datasets Missing?
If you find that none of your users or datasets are present following the upgrade, then this may be because the SuperADMIN service started up automatically when you installed SuperSERVER. If you are upgrading from a version earlier than 9.9 then SuperADMIN automatically migrates its datastore from XML to an RDBMS on first start. If the service started up before you had copied across your existing XML files then it will have migrated an empty catalogue. To resolve this, do the following:
Run the following command in SuperADMIN:
CODEcfg global superadmin.migration.userCatalog set "false"- Restart the SuperSTAR service.
Step 13 - Import the Configuration Server Settings
This step is only required if the version you are upgrading from is SuperSTAR 9.0 or higher (for example it is required if you are upgrading from version 9.0 to 9.8). It is not required if you are upgrading from SuperSTAR 8 or earlier.
In the SuperADMIN console, run the following command:
cfg load <filename>This command loads the configuration server settings you saved in the earlier step. Replace <filename> with the full path to the file on disk where saved the settings. Do not use quotes even if the path contains spaces.
For example:
cfg load D:\Backup Directory\configuration settings.jsonStep 14 - Advise Users that Upgrade is Complete
Advise your users that the upgrade is complete.
