Add SQL Server Microsoft JDBC Driver to SuperCHANNEL
JDBC (Java Database Connectivity) is a programming interface that lets Java applications access a relational database.
SuperCHANNEL needs a JDBC driver so that it can access the relational database system (e.g. SQL Server, Oracle, etc) where your source data is stored.
Before you can run SuperCHANNEL, you need to install the appropriate JDBC driver and configure SuperCHANNEL so that it can access the driver.
In most cases the JDBC drivers are supplied by the database vendors. STR does not supply the drivers.
Microsoft SQL Server
If your source data is stored in a Microsoft SQL Server database, then you can configure SuperCHANNEL to use the Microsoft JDBC Driver for SQL Server. This driver is a pure Java (type 4) JDBC 4.0 driver for Microsoft SQL Server (6.5, 7, 2000, 2005, 2008 and 2012).
Step 1 - Download and Install the Driver
- Download the latest version of the Microsoft JDBC Driver for SQL Server from http://www.microsoft.com/en-au/download/details.aspx?id=11774. The download file will be an executable with a name similar to sqljdbc_4.0.2206.100_enu.exe
-
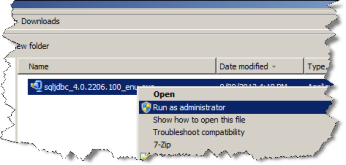
Run the executable to extract the files.
You will be prompted to enter a folder name to receive the unzipped files.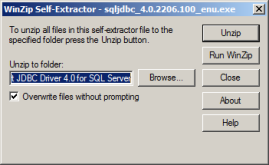
-
Select a location that contains no spaces, such as D:\drivers
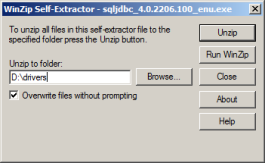
-
Wait for the driver package to unzip all the files.
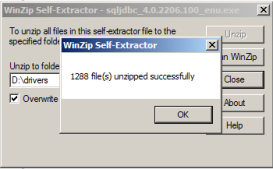
The root directory for the downloaded files is sqljdbc_4.0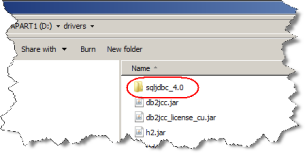
The driver JAR files themselves are unpacked under a directory that depends on the language you chose for the download. For example, here the directory is enu, as an English download was chosen.

After the package unpacks, you can view the JDBC Help System by opening %InstallationDirectory%\Microsoft JDBC Driver 4.0 for SQL Server\sqljdbc_<version> <language>\help\default.htm
To support backward compatibility and possible upgrade scenarios, the JDBC Driver includes two JAR class libraries in each installation package: sqljdbc.jar and sqljdbc4.jar
- In most cases you will need to use sqljdbc4.jar
- The sqljdbc.jar class library provides support for JDBC 3.0. It requires Java Runtime Environment (JRE) version 5.0. Using sqljdbc.jar with JRE 6.0 or JRE 7.0 will throw an exception when connecting to a database.
- You should retain the subdirectory structure that was created by the self-extracting archive. You cannot copy and use the jar files in isolation from the rest of the extracted files.
Step 2 - Edit the SuperCHANNEL Configuration
- Locate the SuperCHANNEL configuration file, config.txt. If you chose the default installation options, this file will be located in C:\ProgramData\STR\SuperCHANNEL\bin
Make a backup copy of this file before making any changes.
-
Open config.txt in a text editor.
-
Locate the line that defines the Java class path property (
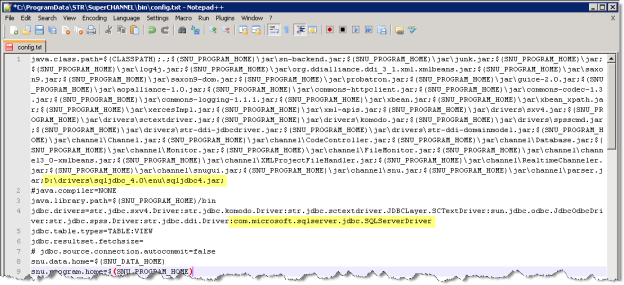
java.class.path=), and add the full path to the driver location to the end of the definition. For example:TEXTD:\drivers\sqljdbc_4.0\enu\sqljdbc4.jar;Each entry in the Java Class Path definition must be separated by a semi colon, and there must also be a semi colon at the end of the line.
-
Locate the line that defines the
jdbc.driversproperty and add the following to the end of the definition:TEXT:com.microsoft.sqlserver.jdbc.SQLServerDriverEach entry in the
jdbc.driversdefinition must be separated by a colon. -
Save config.txt.
The following example shows the two additions to the configuration file:
Step 3 - SQL Server Express Only
If you are using SQL Server Express, you may encounter a connection error ("connection refused") when you attempt to connect to the database in SuperCHANNEL. This is because SQL Server Express is configured by default to use dynamic TCP/IP ports.
Before starting SuperCHANNEL, do the following:
- Open SQL Server Configuration Manager.
- Select SQL Server Network Configuration.
- Select Protocols for MSSQLSERVER or Protocols for SQLEXPRESS (depending on your SQL Server version).
- Open the TCP/IP Properties and select the IP Addresses tab.
- Check at the bottom whether TCP Dynamic Ports has a value. If it does, clear the value and leave the field blank.
- Change TCP Port to 1433 (or your preferred port).
Step 4 - Start SuperCHANNEL
Start SuperCHANNEL, select File > Connect to Source, and enter the connection string in the Location field.
The basic form of the connection string is as follows:
jdbc:sqlserver://<servername>;databaseName=<databasename>Where:
<servername>is the name of your host for SQL Server<databasename>is the name of the source database to connect to.
You may also need to specify other settings. In particular, if you are using Windows integrated security (i.e. you connect to SQL server using your Windows domain account), then you may need to specify the integratedSecurity property, as well as copying the sqljdbc_auth.dll file supplied with the driver to a directory that is in your Windows system path.
In this case, the connection URL will be similar to the following:
jdbc:sqlserver://<servername>;databaseName=<databasename>;integratedSecurity=trueThere are a number of help files supplied with the SQL Server driver and these contain more details about how to construct the correct URL. See "Building the Connection URL" and "Connecting with Integrated Authentication" in the driver help system for further information.
You will also need to provide user credentials (for SQL Server authentication) and a schema name for connection to succeed:

Step 5 - Update the SNU Class Path
You may also need to add your driver to the SNU class path. This step is only required if:
- You have saved the driver JAR file somewhere other than the SuperCHANNEL drivers directory; and
- You intend to run SuperCHANNEL from the command line or via scripting using SNU, the SuperCHANNEL Command Line Utility .
The SNU class path is defined in snu.bat. By default this file is located in C:\ProgramData\STR\SuperCHANNEL\bin
Make a backup copy of this file before making any changes.
Locate the following section:
"%JAVA_HOME%\bin\java" %JAVA_OPTS% -Xmx%SNU_JVM_HEAP%
    -classpath "%CLASSPATH%;.;%SNU_PROGRAM_HOME%\jar\*;%SNU_PROGRAM_HOME%\jar\drivers\*;%SNU_PROGRAM_HOME%\jar\channel\*"
    "-Djava.library.path=%SNU_PROGRAM_HOME%\bin" "-Dsxv4driver.home=%SNU_DATA_HOME%\bin"
    "-Dsnu.data.home=%SNU_DATA_HOME%" "-Dsnu.program.home=%SNU_PROGRAM_HOME%" str.snu.snu %1 %2 %3 %4 %5 %6 %7 %8 %9
To use SNU with this source, the -classpath setting must include the location of your driver. As you can see, the class path already includes all files in the %SNU_PROGRAM_HOME%\jar\drivers\ directory, so this step is only required when you have stored the driver somewhere else.
Add the driver location to the class path. For example:
"%JAVA_HOME%\bin\java" %JAVA_OPTS% -Xmx%SNU_JVM_HEAP%
    -classpath "%CLASSPATH%;.;%SNU_PROGRAM_HOME%\jar\*;%SNU_PROGRAM_HOME%\jar\drivers\*;%SNU_PROGRAM_HOME%\jar\channel\*;D:\drivers\sqljdbc_4.0\enu\sqljdbc4.jar"
    "-Djava.library.path=%SNU_PROGRAM_HOME%\bin" "-Dsxv4driver.home=%SNU_DATA_HOME%\bin"
    "-Dsnu.data.home=%SNU_DATA_HOME%" "-Dsnu.program.home=%SNU_PROGRAM_HOME%" str.snu.snu %1 %2 %3 %4 %5 %6 %7 %8 %9