Packaging - SuperCROSS
If you are distributing SuperCROSS to your users either via the network or by providing an installer on CD, you may wish to customise the standard installer so that it includes your own preferred settings and local databases.
This section describes how to customise the SuperCROSS installer for distribution.
Step 1 - Extract the Installation Files
The first step is to unzip the SuperCROSS installation files to a location on your local hard disk so that they can be modified.
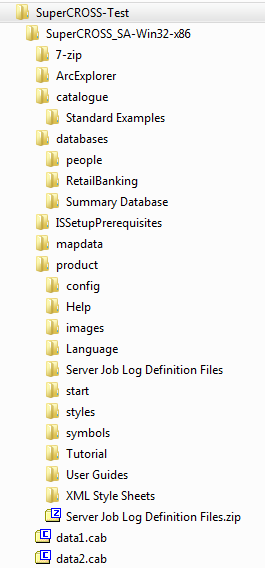
The file structure will be similar to the following:

Step 2 - Apply Custom Configuration
The next step is to apply your customisations by editing the SuperCROSS configuration files. The main file you will need to edit is the product.ini configuration file. This is located in the product directory, and controls the installation process.
Following are some typical customisations:
| Preconfigure the License Key | To preconfigure your SuperCROSS installation so that users do not need to enter the license key during the install, add your key to the
TEXT
|
|---|---|
| Add SXV4 Databases | To add your own SXV4 files so that they are automatically installed with SuperCROSS, do the following for each SXV4:
|
| Customise the SuperCROSS Application Name | Edit the For example:
TEXT
|
| Remove the Default STR Databases | If you do not want to bundle the sample databases (Retail Banking and People), then you can remove these from the installer:
|
| Change the Installer Splash Screen | The splash screen displays when the installer first starts. To replace the default branding with your own splash screen, replace the file setup.bmp with your own image. Your replacement image must be:
|
| Change the Installer Information Screens | During the installation process, there are two screens that display showing information about the product. To replace the default branding with your own images, replace the files bbrd1.bmp and bbrd2.bmp in the product directory. Your replacement images must be:
|
| Replace the User Guide | The user guide is stored in product\Help\SuperCROSS\user_guide. You can replace the supplied HTML files with your own user guide content by replacing the files in this directory. The index to your user guide must be named index.html. |
| Bundle Additional Files | If you need to bundle additional files with the installation, such as product guides and other documentation, copy these to the product\User Guides directory. Any files in this directory will be copied to the User Guides directory in the SuperCROSS program files. |
Support Email Address | Edit the super.ini configuration file (located in the product directory) to customise the support email address that is linked from the Help > E-mail Support menu option. |
| Contact and Copyright in Downloads | Edit the super.ini configuration file to change the contact details and copyright statements that are included in download files. You will typically want to edit the HomeLink, Email and Copyright settings for both HTML and Excel downloads. |
| Default SuperCROSS settings | If there are any other default SuperCROSS settings you want to change, edit the configuration files. For example, you may want to change settings in the cross.ini configuration file and the super.ini file. Both of these are located in the product directory of the installation files. |
Step 3 - Test the Installer and Distribute
Once you have finished making changes, test your installer locally.
When you are happy you can either burn the installer files to CD or create a ZIP file for distribution.
