Annotations
The SuperSERVER annotation functionality allows you to automatically show additional information or explanatory notes when particular fields and values appear in a table.
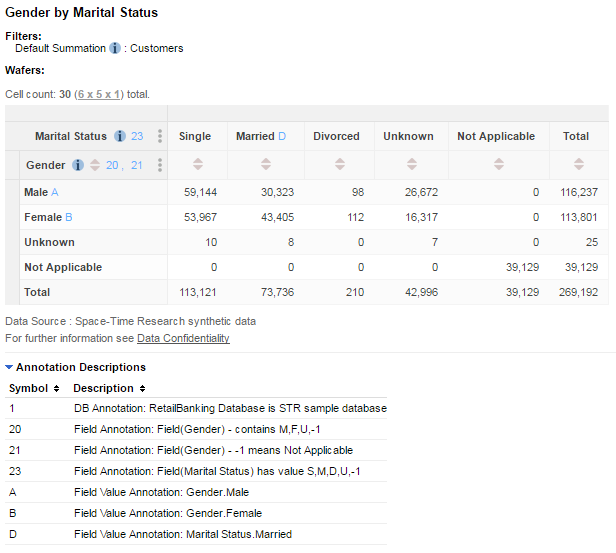
The clients display the annotations beneath the table. For example:

You can enable annotations for a field (for example: Gender), a field value (for example: Male), an individual cell value (a specific combination of fields) or an entire dataset.
You can also use conditional annotations to provide further control over when a particular annotation is shown (for example, to show a particular annotation when a given field appears in the table, except when another specific field is also in the table).
You are recommended not to create more than 100,000 annotations on any particular table.
SuperSERVER stores annotations in a relational database called the static annotation repository, which you need to create using a public domain relational database implementation called SQLite.
The annotation repository must be stored in a file named <database_filename>.sxv4.sqlite.db, saved in the same directory as the SXV4 database file it relates to. For example:
If the Database File Is... | The Annotation Repository Must Be... |
|---|---|
| C:\ProgramData\STR\SuperSERVER SA\databases\RetailBanking.sxv4 | C:\ProgramData\STR\SuperSERVER SA\databases\RetailBanking.sxv4.sqlite.db |
| C:\ProgramData\STR\SuperSERVER SA\databases\people.sxv4 | C:\ProgramData\STR\SuperSERVER SA\databases\people.sxv4.sqlite.db |
| E:\Databases\SurveyResults2013.sxv4 | E:\Databases\SurveyResults2013.sxv4.sqlite.db |
From version 9.9.3 onwards, SuperSERVER supports two types of annotation: static annotations, which can be assigned to specific datasets, fields, values and cells, and conditional annotations, which provide advanced control over when the annotation is shown (for example you can configure annotations to only display if a specific combinations of fields appear in the table). Learn more.
The following steps explain how to create your own annotation repositories.
Step 1 - Create your SQL Scripts
The first step is to create a script file containing all the SQL statements required to populate your annotation database. SuperSERVER is supplied with a number of files to help you with this step, which you can find in C:\ProgramData\STR\SuperSERVER SA\etc\annotations (or the equivalent directory if you installed to a different location):
- schema.sql contains SQL statements for creating an empty annotation repository. You do not need to edit this file; you will use it in the next step to create an empty annotation repository, ready to be populated with your annotations.
- RetailBanking.sql and financial.sql contain examples of the SQL required to populate the annotation repository. You can use these as a template for writing the SQL insert statements you need to populate your own annotation repository.
- RetailBanking.sxv4.sqlite.db and Financial.sxv4.sqlite.db are examples of pre built annotation repositories for the sample databases. You can test these out by copying them to the same directory as the sample SXV4 databases (C:\ProgramData\STR\SuperSERVER SA\databases by default).
To setup your SQL scripts:
- Make a copy of either RetailBanking.sql or financial.sql and save it in the same directory as your database. Rename it to match the name of your SXV4.
- Open the SQL file in a text editor.
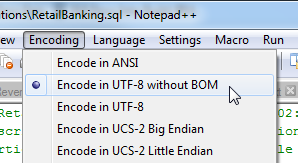
Make sure that your SQL file is encoded in UTF-8 without a Byte Order Mark. This step is particularly important if you will be using non-ASCII characters, as it will allow you to use the full range of unicode characters in your annotations.
The way to check and set the text file encoding depends on your text editor (not all text editors allow you to do this). For example in Notepad++ you can do this using the Encoding menu:

If you are using non-ASCII characters, you must also ensure that your annotations schema includes the
FileInfotable with theFileVersionset to2. This table will be created automatically if you use the supplied schema.sql file to create your initial annotation repository.- Modify the SQL insert statements to define the annotations you want for your database.
As you will see if you inspect the sample files (RetailBanking.sql or financial.sql), there are a number of tables you need to populate to set up your annotations:
Table | Description | ||||||||
|---|---|---|---|---|---|---|---|---|---|
AnnotationDetails | Each row in this table contains an individual annotation. There are three columns in this table:
| ||||||||
DBAssignment | Use this table to assign an annotation to the entire database. The annotation will be shown for all tables created using this database. This table contains a single column ( | ||||||||
FieldAssignment | Use this table to assign an annotation to a specific field. The annotation will be shown whenever this field appears in the table. There are three columns in this table: set | ||||||||
FieldValueCodeAssignment | Use this table to assign an annotation to a specific field value. | ||||||||
CellAssignment | Use this table to assign annotations to specific cell values. This table works in conjunction with the Annotation table. | ||||||||
Annotation | Use this table to store joins between the AnnotationDetails and CellAssignment. | ||||||||
FileInfo | This table sets the annotation file version. It must contain a single row with the values This table is required if you are using non-ASCII characters in annotations (i.e., your annotations include Unicode characters). The |
Step 2 - Check the SQLite Version
To configure the static annotations, you need the SQL command line utility sqlite.exe. A version of this utility is provided with SuperSERVER, in C:\Program Files\STR\SuperSERVER SA. You can also download it from www.sqlite.org.
SuperSERVER requires SQLite version 3.3 or above. You can check the version you have installed using the following command from a command prompt:
C:\>sqlite -version
3.7.4
C:\>
Step 3 - Create the Annotation Repository
Once you have finished creating your own SQL script file, you can use SQLite to create the static annotation repository file.
Open a command prompt and navigate to the directory containing the SXV4 database. For example:
TEXTC:\>cd /d "E:\Databases\"Use the command
sqlite <database_name>.sxv4.sqlite.dbto start SQLite and begin creating the repository file.For example:
TEXTE:\databases>sqlite SurveyResults2013.sxv4.sqlite.db SQLite version 3.7.4 Enter ".help" for instructions Enter SQL statements terminated with a ";" sqlite>Run the supplied schema script to set up the empty repository. You can either use a relative or an absolute path to the schema.sql file, but you must use forward slashes. For example:
TEXTsqlite> .read "C:/ProgramData/STR/SuperSERVER SA/etc/annotation/schema.sql"Run the SQL file you created in the previous step. You can either use a relative path (relative to the current directory) or an absolute path, but must use forward slashes. For example:
CODEsqlite> .read SurveyResults2013.sqlClose SQLite:
CODEsqlite> .exit C:\ProgramData\STR\SuperSERVER SA\databases>
You can now start one of the SuperSTAR clients and open the database to see your annotations in use.
There is no additional SuperSERVER configuration required for it to start using your annotations. As long as the SQLite database file is in the same directory as the SXV4 database (and the SXV4 has been added to the SuperSERVER database catalogue in SuperADMIN), then the server will automatically send the annotations to the clients to display.
Updating the Annotations
If you need to make further changes to the annotation repository, you can simply:
- Edit the SQL file to contain your new annotations.
- Delete the existing .sqlite.db file.
- Repeat Step 3 above to recreate the annotations.
Alternatively, you can use a tool like SQLite Browser (available from http://sqlitebrowser.org/) to make changes to your SQLite database file without recreating it from scratch.
In some cases you may not be able to delete or update the existing .sqlite.db file because it is locked by the SuperSERVER process (scsa.exe). In this case you may need to use SuperADMIN to remove the database from the SuperSERVER database catalogue first so that SuperSERVER releases its file lock on the .sqlite.db file. You can then add the database back to SuperSERVER once you have rebuilt your annotation repository.
Multilingual Annotations
If you are using the Metadata Server to display your datasets in multiple languages, then you can also translate your dataset annotations.
You need to create a table in your metadata database called fnote_<dataset_id> for each dataset that has annotations, and make sure this is referenced in the ss_fnote column of the db_domain table.
You can then populate your fnote_<dataset_id> table with the translations of your annotations: add the annotation symbol to the ss_code column and the translated text to the <lang>_name column. See Reference for more details on populating the fnote_<dataset_id> table.
Using a Graphical Editor to Populate the Annotations Database
As an alternative to using the command line interface to create your SQLite DB file, there are several third party browser tools for editing SQLite files. For example: http://sqlitebrowser.org/
If you decide to use one of these tools to edit your file, then you simply use the supplied schema.sql file to populate the initial schema of the repository and then add your annotations via the editor GUI.
Learn More
There are some other ways you can create annotations and have them display with the table:
- Users can create annotations directly in SuperCROSS, although those annotations are not saved to the server. Users who create their own annotations can view them during the current SuperCROSS session and save them with the table. Learn more about annotations in SuperCROSS.
- You can write your own Data Control module to add your custom annotations. See Annotations for more information.
