Install - SuperWEB2
These instructions explain how to install and set up SuperWEB2 on Apache Tomcat. If you are an end user of SuperWEB2 then you do not need to follow these steps–your system administrator will already have set up SuperWEB2; all you need to connect is your web browser. See the SuperWEB2 User Guide for more information.
These are the instructions for installing just SuperWEB2. Alternatively, you can install the SuperSTAR Suite, which installs all the SuperSTAR applications, including SuperWEB2, the Java Runtime Environment, and Apache Tomcat, as part of a single install process.
Notes
- For full details of the system requirements for SuperSTAR, refer to Installation Requirements, Compatibility and Supported Platforms.
SuperWEB2 requires the following third party software:
Apache Tomcat http://tomcat.apache.org/ Java Runtime Environment (JRE) https://java.com/en/download/ You will need to ensure that the firewall rules are configured appropriately to allow connections to the machine running Tomcat. By default, Tomcat uses port 8080. For more information about the ports used by the entire SuperSTAR suite, see Port Usage - SuperSTAR.
Step 1 - Install Tomcat
Before you can install SuperWEB2 you need to install Tomcat. You can either use an existing Tomcat installation, or you can use the Tomcat deployment that is supplied with SuperWEB2.
Space-Time Research recommends that you independently assess the security requirements for any network exposed computer application and take appropriate steps to protect it. The official Tomcat security FAQ is at http://wiki.apache.org/tomcat/FAQ/Security
For more information, see http://www.unidata.ucar.edu/Projects/THREDDS/tech/reference/TomcatSecurity.html
To install the Tomcat deployment supplied with SuperWEB2:
- Extract the SuperWEB2 ZIP file.
Copy the Tomcat directory from the extracted files to the location where you want to install Tomcat and SuperWEB2.
The standard installation location is C:\ProgramData\STR\SuperWEB2\Tomcat (this is the location used if you install SuperWEB2 using the SuperSTAR Suite installer), but you can choose a different location if you prefer.

Step 2 - Install SuperWEB2
- Extract the SuperWEB2 ZIP file if you have not already done so.
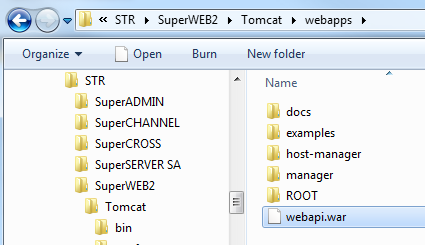
Copy War Files\ webapi.war from the extracted files to <tomcat_home>\webapps
The location of <tomcat_home>\webapps will depend on where you have installed Tomcat on your system, but if you are using the standard installation location it will be C:\ProgramData\STR\Tomcat\webapps:

webapi.war contains all the SuperWEB2 files. Its contents will be extracted to <tomcat_home>\webapps\webapi when you start Tomcat.
- Copy tomcatLibs\spring-agent.jar from the extracted files to <tomcat_home>\lib
- Go back to the files you extracted from the SuperWEB2 ZIP and locate the tomcatScripts directory.
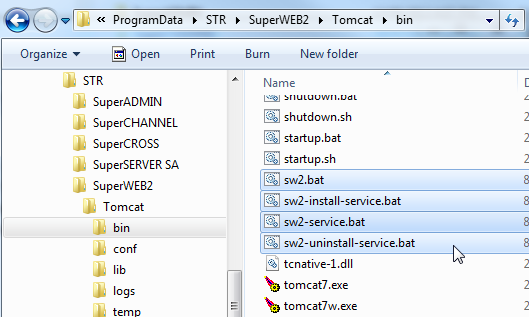
Copy the four files from this directory (sw2.bat, sw2-install-service.bat, sw2-service.bat and sw2-uninstall-service.bat) to <tomcat_home>\bin:

If you are not using the standard SuperWEB2 installation location, you need to make a change to sw2.bat, sw2-install-service.bat and sw2-uninstall-service.bat.
In each file, locate the following line:
CODEset CATALINA_HOME=C:\ProgramData\STR\SuperWEB2\TomcatChange the value of
CATALINA_HOMEto match the location of <tomcat_home> on your system.Check that sw2.bat, sw2-install-service.bat and sw2-uninstall-service.bat specify the correct location of the Java Runtime Environment (JRE) on your system.
In sw2.bat, update the value of the
JAVA_HOMEvariable to match the location of the JRE installed on your system. For example:CODEset JAVA_HOME=C:\Program Files\Java\jre8In sw2-install-service.bat and sw2-uninstall-service.bat update the value of the
JRE_HOMEvariable to match the location of the JRE installed on your system. For example:CODEset JRE_HOME=C:\Program Files\Java\jre8
Step 3 - Start Tomcat/SuperWEB2
You are now ready to start Tomcat and SuperWEB2. You can either start Tomcat manually or install it as a Windows Service that will start automatically when the machine starts.
Start Tomcat Manually
Go to <tomcat_home>\bin and execute sw2.bat. This script sets some standard environment variables and runs Tomcat.
If you do not want to use the supplied batch file, or you want to configure the environment variables, you can create your own script for running Tomcat.
Install the Windows Service
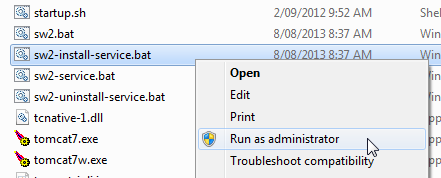
Go to <tomcat_home>\bin and execute sw2-install-service.bat. This will install a Windows service called SuperWEB2.
You must execute sw2-install-service.bat with administrator permissions, otherwise it will not be able to install the Windows service.

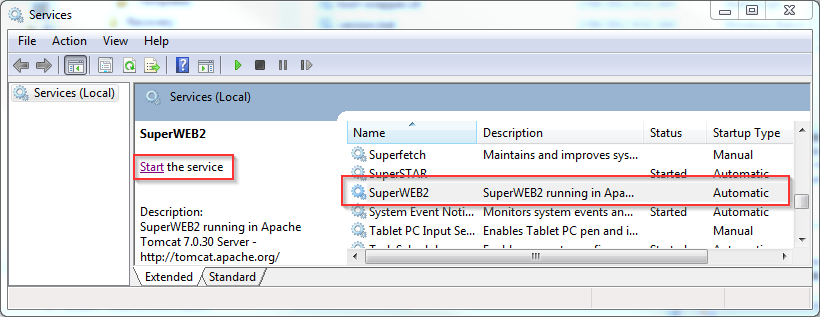
Go to the Windows Services console and start the service.

Step 4 - Verify the Installation
Verify that SuperWEB2 is installed by opening a web browser. The default URL for SuperWEB2 is http://<hostname>/webapi or http://<hostname>:<port>/webapi (where <hostname> is the server running the SuperWEB2 application and <port> is the port to connect on).
By default, you should be able to connect to SuperWEB2 using http://localhost:8080/webapi

Verify that you can login to SuperWEB2 and open a dataset.
If this is a new installation you can login using the default user1 test account. Learn more about the default user accounts.
If you have installed SuperWEB2 on a different machine to SuperSERVER, you must configure the SuperWEB2 connection to SuperSERVER.
Step 5 - Post Install Configuration
Once you have completed the installation, there are some required changes you should make before you go into production:
- Configure the User Data Repository (UDR). The UDR is used to save user tables and custom groups (recodes). By default it is configured to use an embedded HyperSQL database. Although this is adequate for demonstration and testing purposes, it should be replaced with another RDBMS system such as SQL Server or Oracle for production use. Learn more...
Set the
facelets.DEVELOPMENTparameter in <tomcat_home>\webapps\webapi\WEB-INF\web.xml to false. Learn more...- Update the support email address in the login error messages. Learn more...
- Apply your corporate branding to the SuperWEB2 interface, and configure your own branded templates for downloading tables, maps and graphs. Learn more...
- Disable Tomcat session persistence. Session persistence across restarts of the Tomcat server is enabled by default in the Tomcat configuration. You should disable this feature before using SuperWEB2 in production. Learn more...
In addition, if you anticipate that SuperWEB2 users will build and populate very large tables, consider implementing the Job Queue Manager. This component is subject to additional licensing. Learn more...
