Add Teradata JDBC Drivers to SuperCHANNEL
JDBC (Java Database Connectivity) is a programming interface that lets Java applications access a relational database.
SuperCHANNEL needs a JDBC driver so that it can access the relational database system (e.g. SQL Server, Oracle, etc) where your source data is stored.
Before you can run SuperCHANNEL, you need to install the appropriate JDBC driver and configure SuperCHANNEL so that it can access the driver.
In most cases the JDBC drivers are supplied by the database vendors. STR does not supply the drivers.
Teradata
If your source data is stored in a Teradata database, then you need to configure SuperCHANNEL to use the Teradata JDBC driver.
Step 1 - Download and Install the Driver
- Download the latest version of the Teradata JDBC driver from http://www.teradata.com/downloadcenter/
- Extract the driver files from the download. The driver files are .jar files, and will be named something like terajdbc4.jar and tdgssconfig.jar.
-
SuperCHANNEL can access the driver files from anywhere on your system, but you are recommended to copy them to the drivers directory in your SuperCHANNEL installation. If you chose the default installation options, the location will be: C:\Program Files\STR\SuperCHANNEL\jar\drivers
Depending on your system configuration, you may need administrator permissions to copy to this directory. If you are prompted to provide administrator permissions, click Continue.
Step 2 - Edit the SuperCHANNEL Configuration
- Locate the SuperCHANNEL configuration file, config.txt. If you chose the default installation options, this file will be located in C:\ProgramData\STR\SuperCHANNEL\bin
Make a backup copy of this file before making any changes.
- Open config.txt in a text editor.
-
Locate the line that defines the Java class path property (
java.class.path=), and add the following to the end of the definition:TEXT$(SNU_PROGRAM_HOME)\jar\drivers\terajdbc4.jar;$(SNU_PROGRAM_HOME)\jar\drivers\tdgssconfig.jar;You will need to replace
terajdbc4.jarandtdgssconfig.jarwith the filenames of the drivers you installed. Each entry in the Java class path definition must be separated by a semi colon.
$(SNU_PROGRAM_HOME)is a predefined variable that refers to the SuperCHANNEL program files directory. If you have chosen not to store the drivers in the SuperCHANNEL drivers directory then you will need to specify the full paths to the driver locations instead. -
Locate the line that defines the
jdbc.driversproperty and add the following to the end of the line:TEXT:com.teradata.jdbc.TeraDriverEach entry in the
jdbc.driversdefinition must be separated by a colon. -
Locate the following section of the configuration file:
TEXT# Uncomment this to force use of a schema qualifier before table names - needed for DB2 and Teradata. # str.usequalifier=. -
Uncomment the
str.usequalifierproperty by removing the # character at the start of the line:TEXT# Uncomment this to force use of a schema qualifier before table names - needed for DB2 and Teradata. str.usequalifier=.This property configures SuperCHANNEL to prepend the schema name you specify at login time whenever it refers to database objects by name. If the table is not prefixed with a schema, Teradata assumes the schema name is the same as the login username, and if the schema and the user name are not the same then the tables cannot be queried from. Therefore SuperCHANNEL cannot read the registry tables and display or build the database correctly.
-
Save config.txt.
The following example shows the driver additions to the configuration file:

Step 3 - Start SuperCHANNEL
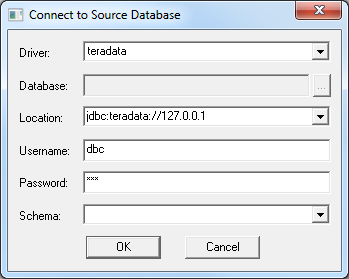
Start SuperCHANNEL, select File > Connect to Source, and use the following connection string to connect to Teradata:
jdbc:teradata://<servername>Where <servername> is the name of your host for Teradata.
You will also need to provide user credentials for Teradata authentication:

Step 4 - Update the SNU Class Path
You may also need to add your driver to the SNU class path. This step is only required if:
- You have saved the driver JAR file somewhere other than the SuperCHANNEL drivers directory; and
- You intend to run SuperCHANNEL from the command line or via scripting using SNU, the SuperCHANNEL Command Line Utility .
The SNU class path is defined in snu.bat. By default this file located in C:\ProgramData\STR\SuperCHANNEL\bin
Make a backup copy of this file before making any changes.
Locate the following section:
"%JAVA_HOME%\bin\java" %JAVA_OPTS% -Xmx%SNU_JVM_HEAP%
    -classpath "%CLASSPATH%;.;%SNU_PROGRAM_HOME%\jar\*;%SNU_PROGRAM_HOME%\jar\drivers\*;%SNU_PROGRAM_HOME%\jar\channel\*"
    "-Djava.library.path=%SNU_PROGRAM_HOME%\bin" "-Dsxv4driver.home=%SNU_DATA_HOME%\bin"
    "-Dsnu.data.home=%SNU_DATA_HOME%" "-Dsnu.program.home=%SNU_PROGRAM_HOME%" str.snu.snu %1 %2 %3 %4 %5 %6 %7 %8 %9
To use SNU with this source, the -classpath setting must include the location of your driver. As you can see, the class path already includes all files in the %SNU_PROGRAM_HOME%\jar\drivers\ directory, so this step is only required when you have stored the driver somewhere else.
Add the driver locations to the class path. For example:
"%JAVA_HOME%\bin\java" %JAVA_OPTS% -Xmx%SNU_JVM_HEAP%
    -classpath "%CLASSPATH%;.;%SNU_PROGRAM_HOME%\jar\*;%SNU_PROGRAM_HOME%\jar\drivers\*;%SNU_PROGRAM_HOME%\jar\channel\*;E:\drivers\terajdbc4.jar;E:\drivers\tdgssconfig.jar"
    "-Djava.library.path=%SNU_PROGRAM_HOME%\bin" "-Dsxv4driver.home=%SNU_DATA_HOME%\bin"
    "-Dsnu.data.home=%SNU_DATA_HOME%" "-Dsnu.program.home=%SNU_PROGRAM_HOME%" str.snu.snu %1 %2 %3 %4 %5 %6 %7 %8 %9